Learn How to Tie Dye with Different Tie Dye Techniques

No matter your age or skill level, tie dye projects are always fun! Whether you're looking for a way to spend some creative time with the family, are searching for a fun graduation idea for your teen, or simply having a few friends or family member over, tie dye is always a safe activity to plan on. Discover how to create the two most popular tie dye techniques, and take a few tips from us below.
If you ever attended a vacation bible school or summer camp, chances are you learned how to tie dye when you were younger. This vintage and colorful project is the perfect way to spend a summer afternoon. There's nothing quite like watching a plain white tee transform into a burst of bright colors! Check out our tutorials below to learn how to make the perfect tie dye design this summer.
Swirl Tie Dye Technique
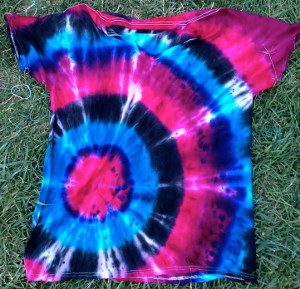
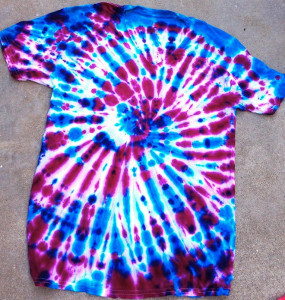
The classic swirl technique is perhaps the most basic method used to get one of the most common tie dye effects. This popular effect is created by simply spinning your shirt into a spiral, once the method is mastered you’ll be able to tie dye anything that you would like, even
- Tie Tye Beach Towel
- Ultimate Tie Dye Effect
- Spiral Tie Dye 101
-
Lay object flat on top of a grate (protect your surface with newspaper below).
-
Pinch the fabric in the center
-
Twirl the fabric in a circular motion around your center pinch.
-
Once completed, secure with rubber bands.
-
Starting in the center, squirt a circle of your first color.
-
Create a circle surrounding your first color in the second color of your choice.
-
Repeat process until all colors are used and the shirt is covered.
-
Flip over and repeat the process identically.
-
Allow to dry for 24 hours.
-
Soak in cold water and allow to dry once more.
-
Wash your tie dyes separately for the first two washes for the color to set completely.
Sun Tie Dye Technique
If the swirl technique is the most basic tie dye method, the sun tie dye technique is the most popular. This simple method is a common form of tie dye instructions that kids and adults alike can join in on. Find your favorite pattern to choose from, like these neat tie dye socks, and get started on your own version today.
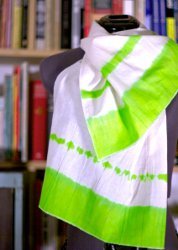
- DIY Tie Dye Tote
- Summery Kimono Cover-Up
-
Pinch the fabric in the center.
-
Pull up an allow shirt to bend.
-
Wrap rubber bands around the shirt to create a space for each desired colors.
-
Alternating colors, drop die onto each section of the shirt.
-
Flip shirt and repeat process identically.
-
Allow to dry for 24 hours.
-
Soak in cold water and allow to dry once more.
-
Wash your tie dyes separately for the first two washes for the color to set completely.
More Tie Dye Techniques
While the swirl and sun tie dye techniques are probably the most popular options, in its nature tie dye is about experimentation! Get to work on a fun and unique pattern that uses your favorite dyes in fun and exciting ways that no one else can duplicate.

Tips + Tricks for Tie Dye Instructions
-
In order to create the perfect tie-dye, soak your desired material in warm water and soda ash for 10 minutes and wring out thoroughly.
-
Never use hot water, as this will prevent the dye from setting properly.
-
Use rubber gloves and an apron to keep the dye from getting on your skin or clothes.
-
Always use a 100% Cotton shirt, they final effect will be more vivid.
Read NextAqua Sole Earrings & Bracelet