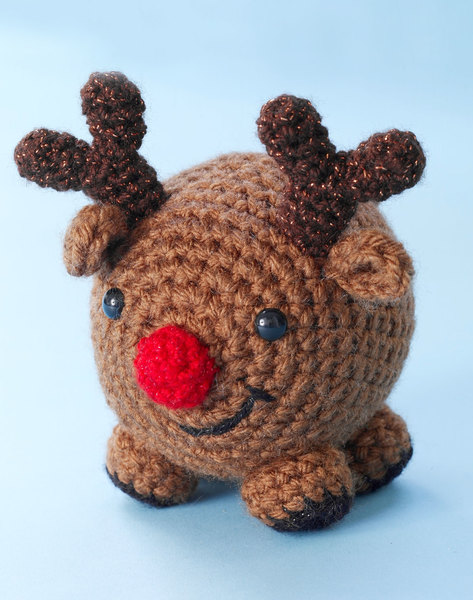
Amigurumi Rudolph the Reindeer
If you think Rudolph the Reindeer is cute, you will fall in love with this simply adorable Amigurumi Rudolph the Reindeer. He's just too cute for words! Use this easy amigurumi crochet pattern to make a herd of these little guys, all your friends and family will want one! Don't let the small pieces intimidate you, they really are very easy to work! Rudolph will look festive on your holiday mantle, or in the arms of a happy child. This easy Amigurmi pattern is fast to work up, so make one for everyone you know!

Materials:
- Lion Brand Vanna's Choice Yarn: Toffee (A)
- Lion Brand Vanna's Glamour Yarn: Onyx (B)
- Lion Brand Vanna's Glamour Yarn: Copper (C)
- Lion Brand Vanna's Glamour Yarn: Ruby Red (D)
- Crochet Hook - Size G-6 (4 mm)
- Split Ring Stitch Markers
- Large-Eye Blunt Needles
- 2 plastic safety eyes, 9 mm diameter
- Fiberfill stuffing
Gauge:
Exact gauge is not essential to this project.
Special Stitches:
sc2tog (sc decrease): Insert hook into st and draw up a loop. Insert hook into next st and draw up a loop. Yarn over, draw through all 3 loops on hook.
Pattern Notes:
- Work in continuous rnds; do not join or turn unless otherwise instructed.
- B,C, and D are worked holding 2 strands tog. Wind B, C, and D into 2 balls before beg.
Instructions:
Reindeer Head and Body:
Beg at front of head. With A, ch 2.
Rnd 1: Work 6 sc in first ch. Place marker in first st for beg of rnd; move marker up as each rnd is completed.
Rnd 2: Work 2 sc in each sc around – 12 sts.
Rnd 3: *2 sc in next st, sc in next st, rep from * around - 18 sts.
Rnd 4: *2 sc in next st, sc in each of next 2 sts, rep from * around – 24 sts.
Rnd 5: *2 sc in next st, sc in each of next 3 sts, rep from * around – 30 sts.
Rnd 6: *2 sc in next st, sc in each of next 4 sts, rep from * around – 36 sts. Following package directions, attach safety eyes to face. Begin to stuff piece. Continue stuffing as work progresses.
Rnds 7-16: Sc in each sc around.
Rnd 17: *Sc2tog, sc in each of next 4 sts, rep from * around – 30 sts.
Rnd 18: *Sc2tog, sc in each of next 3 sts, rep from * around – 24 sts.
Rnd 19: *Sc2tog, sc in each of next 2 sts, rep from * around – 18 sts.
Rnd 20: *Sc2tog, sc in next st, rep from * around – 12 sts.
Rnd 21: *Sc2tog, rep from * around – 6 sts. Fasten off.
Ears (make 2):
With A, ch 2.
Rnd 1: Work 6 sc in first ch.
Rnd 2: Sc in each of next 2 sts, 2 hdc in each of next 2 sts, sc in each st to end. Fasten off.
Tail:
With A, ch 2.
Rnd 1: Work 4 sc in first ch.
Rnd 2: Work 2 sc in each st around – 8 sts
Rnd 3: Sc in each st around. Fasten off.
Legs (make 4):
With 2 strands of B held tog, ch 2.
Rnd 1: Work 6 sc in first ch. Place marker in first st for beg of rnd; move marker up as each rnd is completed.
Rnd 2: Work 2 sc in each st around – 12 sts. Change to A.
Rnd 3: Sc through back loop in each st around– 12 sts.
Rnds 4-5: Sc in each st around, stuffing as work progresses. Fasten off.
Nose:
With 2 strands of D held tog, ch 2.
Rnd 1: Work 6 sc in first ch.
Rnd 2: Work 2 sc in each st around – 12 sts. Change to A.
Rnd 3: Sc in each st around. Fasten off.
Antlers (make 2):
With 2 strands of C held tog, ch 2.
Rnd 1: Work 6 sc in first ch. Place marker in first st for beg of rnd; move marker up as each rnd is completed.
Rnds 2-5: Sc in each st around, stuffing as work progresses. Fasten off.
Antler Tips (make 4):
With 2 strands of C held, ch 2.
Rnd 1: Work 6 sc in first ch. Place marker in first st for beg of rnd; move marker up as each rnd is completed.
Rnds 2-4: Sc in each st around, stuffing as work progresses. Fasten off.
Finishing:
Sew Antler Tips to Antlers, then sew Antlers to head. Sew Ears to head. Sew Legs to body. Lightly stuff Nose and sew to face. With 1 strand of B, embroider straight st smile. Sew Tail to body. Weave in ends.
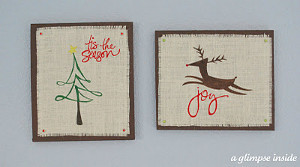
Read NextRustic Burlap Christmas Art
Your Recently Viewed Projects
Thanks for your comment. Don't forget to share!
Report Inappropriate Comment
Are you sure you would like to report this comment? It will be flagged for our moderators to take action.
Thank you for taking the time to improve the content on our site.


![Christmas Tree Advent Calendar [free Printable]](http://irepo.primecp.com/2020/11/474504/1606686091_861246_Category-CategoryPageDefault_ID-4064418.jpg?v=4064418)