This project was submitted by one of our readers, just like you.
Diy Slap Bracelets

Diy Slap Bracelets
"You won’t believe how easy it is to make DIY Slap Bracelets. Remember slap bracelets from way back when? Everybody had one! I was so excited to share this with my daughter! She wears hers all the time. Now you can make your own (and get kids to help) with just a few supplies. Here’s what you need to make DIY Slap Bracelets: measuring tape (the kind you buy at the hardware store), a screw driver, scissors, and duct tape. "
Primary TechniqueJewelry Making

Materials List
- Measuring Tape (the kind you buy at the hardware store)
- Screw Driver
- Scissors
- Duct Tape
Instructions
-
Use the screw driver to remove the outer casing of your measuring tape. Cut off the metal end of the tape and then cut a piece that is 6 inches long. You’ll need a 6-inch piece for each slap bracelet that you want to make.
-
Home » Kids Crafts » Arts and Crafts for Kids » DIY Slap Bracelets DIY SLAP BRACELETS February 12, 2017 by Arena (Edit) 314 SHARES Share Tweet Pin You won’t believe how easy it is to make DIY Slap Bracelets. Remember slap bracelets from way back when? Now you can make your own (and get kids to help) with just a few supplies. It’s really fun to make your own jewelry. DIY Slap Bracelets DIY SLAP BRACELETS Here’s what you need to make DIY Slap Bracelets: Measuring Tape (the kind you buy at the hardware store) Screw Driver Scissors Duct Tape Use the screw driver to remove the outer casing of your measuring tape. Cut off the metal end of the tape and then cut a piece that is 6 inches long. You’ll need a 6-inch piece for each slap bracelet that you want to make. DIY Slap Bracelets Use the scissors to round the edges of the piece of measuring tape.
-
Curl the tape back onto itself, bending it back so that it rolls with the numbered side up. You’ll start to feel it become more malleable. You’ll know it’s ready when you can slap it onto your wrist and it wraps around it!
-
Cut a piece of duct tape just larger than your bracelet. Lay it onto the numbered side of your measuring tape, and wrap it around the tape to the back side. Cut a smaller piece to cover the remaining bracelet on the underside.
-
Now your bracelets are ready to use! Time to start slapping!
-
We also really love making craft stick bracelets — they are super easy, too! And if you have a little kid, they will love making toddler friendship bracelets.

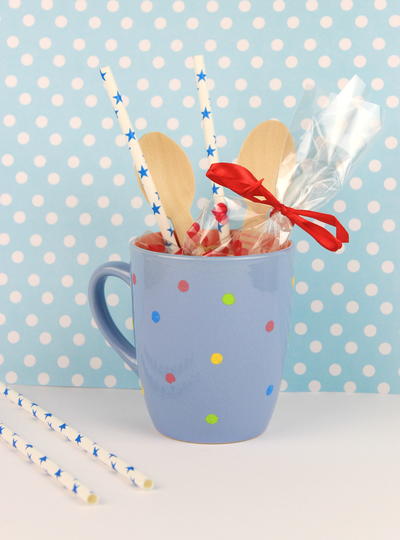
Read NextHandmade Polka Dots Mug Gift Idea