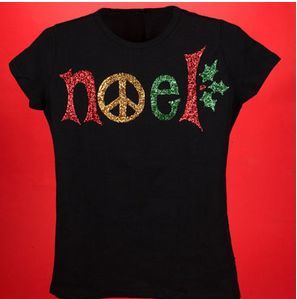
Peaceful Holiday Tee
This Peaceful Holiday Tee is the perfect DIY shirt to wear around the holidays. All you need to make this easy holiday shirt is a shirt, of course, and some fabric paint. To really spread some holiday cheer, make sure the paint is sparkly. If you’ve ever wanted to know how to make your own t-shirts, follow this simple tutorial. These shirts make perfect inexpensive gifts. Make one for yourself and for all your friends and you can match this holiday season.

Materials:
-
Tulip® Fashion Glitter® - Apple Red Jewel
-
Tulip® Fashion Glitter® - Emerald Fine Jewel
-
Tulip® Fashion Glitter® - Gold Fine
-
Tulip®T-shirt Form
-
Tulip® Dimensional Fabric Paint - True Red
-
Old craft paintbrush
-
Paper towels
-
Iron
-
Scratch paper
-
T-shirt - black - 100% cotton
-
White chalk - sharpened to a point
- Permanent felt pen
Instructions:
-
Wash T-shirt without fabric softener sheets to remove sizing. Dry in dryer without dryer sheets and iron smooth.
-
Insert Fashion Form into shirt to prevent paint seepage.
-
Use permanent felt pen to trace over pattern. Flip over pattern – the lines should show through – then use chalk to lightly trace over lines.
-
Position pattern on shirt, hold in place with hand then run a finger over lines – transferring chalk to fabric. Remove pattern.
-
Test flow of True Red Slick 3D Fashion Paint on paper towel using an even pressure on bottle for a smooth line. On T-shirt, outline “N” with Red Slick paint then fill in with an even application of paint. Immediately pour Apple Red Glitter over wet paint. Repeat step with all Red sections. Set aside for about 10 minutes – enough to let paint slightly dry.
-
Place scratch paper on work surface the pour excess glitter from shirt onto paper. Tap Fashion Form to remove more – not all glitter will be removed and do not touch paint, as it is still wet. Glitter can be returned to bottle and re-used.
-
Repeat steps on remaining sections with colors shown – letting each slightly dry before removing glitter.
- Let all thoroughly dry. Use paintbrush to dust off all excess glitter.