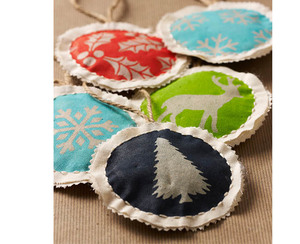
Cozy Homemade Fabric Ornaments
Do you want your tree to look uniform, yet homey? These Cozy Homemade Fabric Ornaments from Plaid Enterprises are the answer to your predicament. You'll just love their adorable, repeating images and soft fabric, but what you'll love more is how easy this homemade Christmas ornament is to make. The sewing pattern is so simple, you can even get your kids or grandkids in on the fun. Sit down and teach them an important skill, while creating special holiday memories that they'll share with their own children someday.
Materials
- Martha Stewart Crafts ® 2oz Multi-Surface Satin Acrylic Craft Paint - Green Curry
- Martha Stewart Crafts ® 2oz Multi-Surface Satin Acrylic Craft Paint - Pool
- Martha Stewart Crafts ® 2oz Multi-Surface Satin Acrylic Craft Paint - Geranium
- Martha Stewart Crafts ® 2oz Multi-Surface Satin Acrylic Craft Paint - Green Curry
- Martha Stewart Crafts ® 2oz Multi-Surface Satin Acrylic Craft Paint - Pool
- Martha Stewart Crafts ® 2oz Multi-Surface Satin Acrylic Craft Paint - Geranium
- Martha Stewart Crafts ® 2oz Multi-Surface Satin Acrylic Craft Paint - Putty
- Martha Stewart Crafts ® 2oz Multi-Surface Satin Acrylic Craft Paint - Deep Sea
- Martha Stewart Crafts ® Holiday Icons Laser-Cut Stencils
- Muslin fabric
- Twine
- Batting
- Cream embroidery floss
- Zigzag scissors
- Scissors
- Cardstock
- Stencil brush
- Sewing needle
- Craft glue
- Purple disappearing marker
Instructions
- Make a 3 ½” circle paper stencil from the cardstock. Stencil each color listed above except for the Putty onto the muslin fabric. Allow each to dry.
- Stencil the holiday icons onto each circle in Putty. Allow to dry.
- Make a 4 1/8” circle template from the cardstock. Place the template over the stenciled icons and make a circle with the disappearing ink marker. Cut out the circle.
- Make another 4 1/8” circle with the disappearing ink marker on plain muslin. Using the zigzag scissors, cut out this circle slightly larger then where the mark of the pen is.
- Place a small amount of batting onto the plain circle. Place the painted circle on top and stitch together around the raw edges.
- Cut a piece of twine and glue in between the circle.
Read NextHomemade Photo Ornament