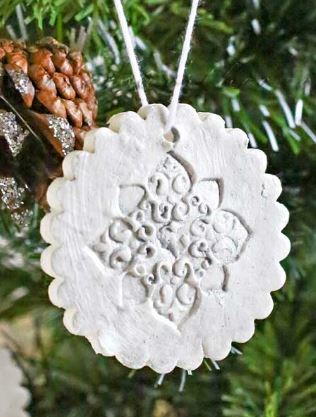
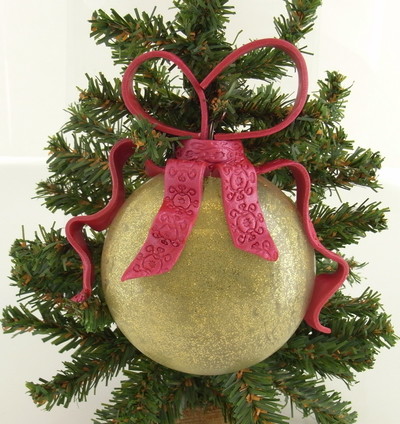
Clay Ribbon Christmas Tree Ornament
The Clay Ribbon Christmas Tree Ornament tutorial will show you how to make a clay ribbon as an embellishment for your DIY Christmas ornament. The clay ribbon looks amazing and it is so easy to make. You can easily upgrade a dollar store Christmas ornament to look like other expensive handmade ornaments. You can choose your clay color to match your Christmas tree theme, too. Clay Christmas crafts have never been easier than this effortless and stylish clay ornament. Make a bunch of these to give out as thoughtful presents for neighbors, coworkers, and friends.

Materials:
-
Premo! Accents®, 2 oz , Magenta Pearl - 1 block of clay
-
Sculpey® Clay Conditioning Machine
-
Sculpey Super Slicer
-
Sculpey Texture Wheel, with 4 Heads
-
Sculpey Texture Wheel, with 4 Heads
-
Texture Wheel Head Pack
-
Glass ornament
-
Gold glitter paint
-
Clear fast drying glue
-
Ruler
-
Plain white paper
-
Spray bottle of water
Instructions:
Note: Good work surfaces for this craft include wax paper, a metal baking sheet, or disposable foil. Knead clay until soft and smooth. Bake on oven-proof glass or metal surface at 275 °F (130 °C) for 30 minutes per 1/4"(6 mm) thickness. For best baking results, use an oven thermometer. For best results, condition all clay by running it through the clay dedicated pasta machine (or your Sculpey® Clay Conditioning Machine) several passes on the widest setting. Fold the clay in half after each pass and insert the folded side into the rollers first.
-
Remove the cap from your glass ornament.
-
Pour a small amount of gold glitter paint inside the ornament. Swirl the paint around, making sure to cover the entire inside of the ornament. Continue to add paint until you like the results. Set the ornament aside and allow it to dry.
-
Use the Clay Conditioning Machine to roll out a sheet of Magenta Pearl on the #1 setting.
-
Use the Super Slicer to cut the sheet in half vertically and press the ends together to form one long sheet. Run the sheet through the Clay Conditioning Machine again. You want to create one long sheet of clay.
-
Place the sheet on your work surface. Lightly mist the clay with water. Use a ruler to create a long straight edge. Position the ruler horizontally towards the top of the sheet.
-
Gently roll the texture wheel (Wrought Iron) across the clay, using the straight edge as a guide.

-
Reposition the straight edge lower on the sheet of clay, at least an inch from the completed row of texture. Create another row of texture. Repeat this process until the sheet of clay is filled.
-
Use the Super Slicer to trim the top and bottom edge of the first line of texture.
-
Repeat this until you have trimmed 4 texture strips. It doesn't matter how much selvage is on the texture strips, as long as you leave the same amount on each piece.

-
Select two strips of the textured “ribbons” and trim to about 5" and cut one end on a diagonal.
-
Position two of the textured “ribbons” on both sides in the middle of the front of the ornament, adding ripples to the clay like ribbon. The diagonal edge should be the bottom edge of the “ribbon”.

-
Use a smaller piece of clay to wrap around the top edge of the ornament hanger.
-
Position two shorter ribbons the front center of the ornament.

-
Cut two more strips of “ribbon” about 4" in length each. These will form the loops of the bow after they are baked.

-
Bake the ornament and the two strips according to the directions above. You can place it on a mound of fiberfill to keep it from rolling around.
-
Once the clay is cool, fold the two strips into loops and use clear, fast setting glue to secure the ends. Glue these into position on both sides of the ornament top, make sure to leave room to place the hanger through the loop. You may want to place the hanger through the loop before gluing the clay ribbon loops into place.
Read NextStamped DIY Clay Ornaments


Thanks for your comment. Don't forget to share!
mulberrygalprinces s
Nov 21, 2016
I make clay jewelry and ornaments and this is lovely but I think I found some errors. First off the Clay is baked at 275 for 15 min per 1/4" not 30 min. And it says after baking and cooling, fold the strips into oval loops. When cool that clay is hard as a rock and there is no way that you can bend it. I think it was meant to say, fold before baking.
Report Inappropriate Comment
Are you sure you would like to report this comment? It will be flagged for our moderators to take action.
Thank you for taking the time to improve the content on our site.