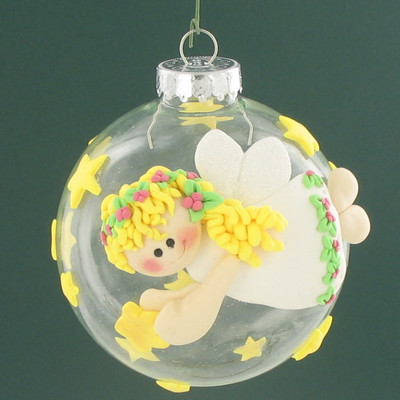
Angelic Clay-Embellished Ornament
If you are looking for easy Christmas ornaments to make this holiday season, check out the Angelic Clay-Embellished Ornament tutorial. This DIY angel ornament is a great upcycling idea because it transforms a plain ornament into an angelic decoration. You will learn how to use clay to create an angel that you can mold to the glass ornament. This easy clay ornament will look awesome on your tree this year because the angel stands out from the surface of the glass and creates eye-catching dimension within your Christmas tree.

Materials:
-
Pluffy®, Kit, Black - 1 block of clay
-
Pluffy®, Kit, Lime Green - 1 block of clay
-
Pluffy®, Kit, Pink - 1 block of clay
-
Pluffy®, Kit, Beige - 1 block of clay
-
Pluffy®, Kit, White - 1 block of clay
-
Pluffy®, 2 oz , Yellow - 1 block of clay
-
Tool set
-
Premo! Sculpey® Fashion Art Glitter Set, Metallic
-
3.5" clear glass ornament
-
Pink chalk or blush
-
White glue
-
Paintbrush
Instructions:
-
Preheat your oven to 275 °F. Use an oven thermometer for perfectly cured clay. Condition all the clay by kneading it until it’s soft and smooth or by running it through the Clay Conditioning Machine for several passes on the widest setting. Fold the clay in half after each pass and insert the folded side into the rollers first.
-
Make a 15/16” White ball into a flattened cone for the dress.
-
Make two 9/16” White balls into flattened teardrops for wings.
-
Make two 1/2" Tan balls into tapered logs for arms.
-
Make two 3/8” Tan balls into flattened cones for feet.

-
Press these pieces onto the ornament as shown in photo.
-
To make the angel's head, roll a 3/4" Tan ball and press it onto the top of the dress. Brush on chalk or blush for the cheeks.
-
Roll several thin Yellow ropes. Gently twist them and add them to the head to create hair.

-
Make some 1/8" Lime Green balls into flattened cones and press them to the bottom of the angel's dress and in her hair in groups of two and three for leaves.
-
Make some 3/32” Pink balls and place them on leaves in groups of two and three for berries.
-
Roll two tiny Black balls for eyes. Using a pointed tool, poke two eye-holes in the head and press the black balls into them.
-
Using a pointed tool, draw a smile.
-
Flatten Yellow clay and cut out star shapes with the blade tool. Place one star in the angel’s hands and others randomly on the ornament.

-
Bake 15 minutes according to the instructions in Step 1.
-
When the ornament is cool, brush some glue on wings and sprinkle them with glitter.
Read NextStamped DIY Clay Ornaments