This project was submitted by one of our readers, just like you.
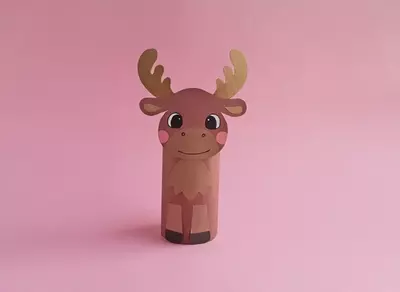
Toilet Paper Roll Moose

Toilet Paper Roll Moose
"This fun toilet paper moose is a perfect activity for your kids to do after school or during the summer break. They will love creating something out of a simple empty toilet paper roll. All you need to do is get an empty toilet paper roll, construction paper, a sharpie, a pencil, craft glue, and scissors. If your kids want to make it more special, they can add pipe cleaners for the horns or googly eyes for the eyes."
Primary TechniquePaper Crafts

Materials List
- Empty Toilet Paper Roll
- Construction Paper
- Craft Glue
- Scissors
- Pencil
- Sharpie
Instructions
-
Select 2 different shades of brown colored paper and a brown colored cardstock paper for the horn patterns. Besides the brown shades, select pink and black colored paper as well. Trace the template patterns on the selected craft papers and cut them out nicely. The template includes head, 2 horns, inner ear patterns, 2 front legs, 2 hoofs, lower part of the face, 1 dewlap (the part below the throat), 2 blush patterns, and 2 eyes.
-
Attach the inner ear cutouts on the ear parts of the head cutout, and attach the lower part of the face on the bottom side of the head cutout. Attach the hoof cutouts on the wide ends of the leg cutouts.
-
Attach the horn cutouts on the top side of the head, keeping the horn branches facing upwards. Attach the eye and blush cutouts on the head pattern.
-
Use a sharpie or gel pen to trace outlines of the eyes and draw the nose and mouth-line of the papercraft moose project.
-
Measure and cut out a piece of brown paper to cover a TP roll.
-
Attach the legs near a side of the prepared paper, keeping the hoof parts along the border, and attach the dewlap pattern above the legs.
-
Attach the head on the top side of the dewlap, overlapping the pattern slightly from the top.
-
Cover the TP roll with the prepared piece (from the previous step). Apply glue to secure the open ends of the paper to secure the TP roll moose craft.

Read NextColored Glitter Pencils!