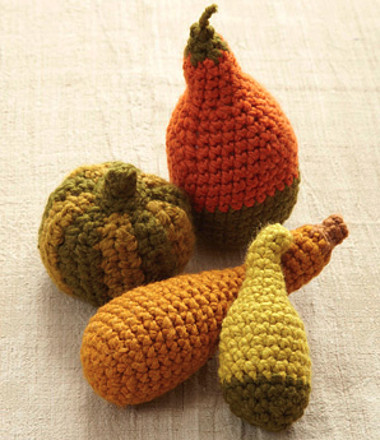
Festive Thanksgiving Crochet Gourds
The Festive Thanksgiving Crochet Gourds are one of our favorite Thanksgiving decorating ideas yet. Gourds are one of the most popular decorations used for Turkey Day, so that's why this craft is perfect for all your Thanksgiving table decorations. Perfect to use as a table centerpiece, this project is sure to turn heads. If you don't use it as a centerpiece, feel free to decorate you mantel with one of these crochet gourds. You'll find that they're so easily made, you can whip up a bunch before you know it.

Materials:
- Wool-Ease Thick & Quick Yarn: Cilantro
- Wool-Ease Thick & Quick Yarn: Pumpkin
- Wool-Ease Thick & Quick Yarn: Butterscotch
- Wool-Ease Thick & Quick Yarn: Hazelnut
- Wool-Ease Thick & Quick Yarn: Citron
- Wool-Ease Thick & Quick Yarn: Snapdragon
- Lion Brand Crochet Hook - Size J-10 (6 mm)
- Lion Brand Split Ring Stitch Markers
- Lion Brand Large-Eye Blunt Needles (Set of 6)
Additional Materials
- Fiberfill stuffing
Instructions:
Gauge:
- Exact gauge is not essential to this project.
Stitch Explanation:
- sc2tog (sc 2 sts together) Insert hook into st and draw up a loop. Insert hook into next st and draw up a loop. Yarn over, draw through all 3 loops on hook - 1 st decreased.
Notes:
- Work in continuous rnds; do not join or turn unless otherwise instructed.
- To change color, work last st of old color to last yarn over. Yarn over with new color and draw through all loops on hook to complete st.
Pear Gourd:
- Beg at base, with A, ch 2.
- Rnd 1: Work 6 sc in first ch.
- Place marker in first st for beg of rnd; move marker up as each rnd is completed.
- Rnd 2: Work 2 sc in each st around - 12 sts.
- Rnd 3: *2 sc in next st, sc in next st, rep from * around - 18 sts.
- Rnd 4: *2 sc in next st, sc in each of next 2 sts, rep from * around - 24 sts.
- Rnd 5: *2 sc in next st, sc in each of next 3 sts, rep from * around - 30 sts.
- Rnds 6-9: Sc in each st around.
- Change to B.
- Rnds 10-13: With B, sc in each st around.
- Rnd 14: *Sc2tog, sc in each of next 8 sts, rep from * around - 27 sts.
- Rnd 15: *Sc2tog, sc in each of next 7 sts, rep from * around - 24 sts.
- Rnd 16: *Sc2tog, sc in each of next 6 sts, rep from * around - 21 sts.
- Rnd 17: *Sc2tog, sc in each of next 5 sts, rep from * around - 18 sts.
- Begin stuffing piece.
- Continue to stuff as work progresses.
- Rnd 18: *Sc2tog, sc in the next st, rep from * around - 12 sts.
- Rnds 19-22: Sc in each st around.
- Change to A.
- Rnd 23: With A, (sc2tog) around - 6 sts.
- Rnd 24: Sc in each st around.
- Fasten off, leaving a long tail.FINISHING
- Draw tail through top of Gourd, pull together tightly and knot. Knot tail again about 2 in. (5 cm) away for 'stem'.
- Weave in ends.
Butternut Squash:
- Beg at base, with C, ch 2.
- Rnds 1-4: Rep Rnds 1-4 of Pear Gourd.
- Rnds 5-9: Sc in each st around.
- Beg stuffing piece.
- Continue to stuff as work progresses.
- Rnd 10: *Sc2tog, sc in each of next 6 sts, rep from * around - 21 sts.
- Rnd 11: Sc in each st around.
- Rnd 12: *Sc2tog, sc in each of next 5 sts, rep from * around - 18 sts.
- Rnd 13: Sc in each st around.
- Rnd 14: *Sc2tog, sc in each of next 4 sts, rep from * around - 15 sts.
- Rnd 15: Sc in each st around.
- Rnd 16: *Sc2tog, sc in each of next 3 sts, rep from * around - 12 sts.
- Rnd 17: Sc in each st around.
- Rnds 18-24: With D, (sc2tog, sc in each of next 3 sts, work 2 sc in next st) twice - 12 sts.
- Change to D.
- Rnd 25: (Sc2tog) around - 6 sts.
- Rnds 26 and 27: Sc in each st around.
- Fasten off.FINISHING Sew top of Gourd closed.
- Weave in ends.
Bi-Color Squash:
- Beg at top of Squash, with E, ch 2.
- Rnd 1: Work 6 sc in first ch. Place marker in first st for beg of rnd; move marker up as each rnd is completed.
- Rnds 2 and 3: Sc in each st around.
- Rnds 4 and 5: Sc2tog, sc in next st, work 2 sc next st, sc in each of next 2 sts - 6 sts.
- Beg stuffing piece.
- Continue to stuff as work progresses.
- Rnd 6: Sc in each of next 2 sts, work 2 sc in next st, sc in next 3 sts - 7 sts.
- Rnd 7: Sc in each of next 2 sts, work 2 sc in the next st, sc in each of next 4 sts - 8 sts.
- Rnd 8: Sc in each of the next 2 sts, work 2 sc in next st, sc in each of next 4 sts, work 2 sc in the last st - 10 sts.
- Rnd 9: Sc in each next 2 sts, work 2 sc in the next st, sc in each of next 6 sts, work 2 sc in last st - 12 sts.
- Rnd 10: *2 sc in next st, sc in next st, rep from * around - 18 sts.
- Rnds 11-15: Sc in each st around.
- Change to A.
- Rnds 16 and 17: With A, sc in each st around.
- Rnd 18: (Sc2tog) around - 12 sts.
- Rnd 19: Sc in each st around.
- Fasten off.FINISHING
- Sew Base of Squash closed.
- Weave in ends.
Green Pumpkin:
Notes:
1. Pumpkin is worked from top to bottom in rows.
2. Do not ch 1 at the beg of rows; just turn.With F, ch 11.
- Row 1: Sc in 2nd ch from hook, sc in next ch, (work 2 hdc in next ch) 6 times, sc in each of last 2 ch.
- Row 2: Turn, sc in each of next 2 sts, (hdc2tog) 6 times, sc in each of last 2 sts.
- Change to A.
- Row 3: Turn, sc in each of next 2 sts, (work 2 hdc in next st) 6 times, sc in each of last 2 sts.
- Row 4: Rep Row 2.
- Change to F.
- Row 5: With F, Rep Row 3.
- Row 6: Rep Row 2.
- Change to A.
- Rows 7-18: Rep Rows 3-6.
- Rows 19 and 20: With A, rep Rows 3 and 4.
- Fasten off.BASE
- With A, ch 2.
- Rnd 1: Work 6 sc in first ch.
- Place marker in first st for beg of rnd; move marker up as each rnd is completed.
- Rnd 2: Work 2 sc in each st around - 12 sts.
- Rnd 3: *2 sc in next st, sc in next st, rep from * around - 18 sts.
Stem:
- With F, ch 2.
- Rnd 1: Rep Rnd 1 of Base.
- Rnd 2: Working through the back loops ONLY, sc in each st around - 6 sts.
- Rnd 3: Sc in each st around.
- Rnd 4: Rep Rnd 2 of Base.
- Fasten off.
Finishing:
- Sew first and last rows of Pumpkin together to form a tube. Sew Base to one end and stuff firmly. Sew Stem to top of Pumpkin.
- Weave in ends.

Read NextThanksgiving Thankful Tree