This project was submitted by one of our readers, just like you.
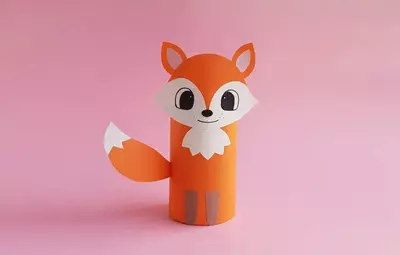
Toilet Paper Roll Red Fox

Toilet Paper Roll Red Fox
"This adorable toilet paper roll red fox is the perfect craft for calm spring afternoon. Grab colored paper, an empty toilet paper roll, a sharpie, craft glue, a pencil, and scissors and you'll be ready make this fun toilet paper craft. If you want to make your toilet paper fox extra fuzzy, simply use felt instead of paper! Spice your red fox up by using googly eyes instead of paper or cotton balls for the tail."
Primary TechniquePaper Crafts

Materials List
- Colored paper
- Empty toilet paper roll
- Sharpie
- Craft glue
- Pencil
- Scissors
Instructions
-
Select black, orange, brown, pink, and white colored papers for the fox TP roll puppet. Trace the head, ear, and tail patterns on the orange paper, trace the tail tip, neck fur, and face patterns on white paper, trace the inner ear parts on pink paper, trace the nose on black paper, and trace the leg patterns on brown paper. Cut out the traced patterns nicely.
-
Attach the tail tip cutout on the tip part of the main tail cutout, attach the inner ear parts on the main ear patterns, and attach the face pattern on the bottom side of the head cutout.
-
Attach the eye cutouts on the face part of the head pattern and attach the nose cutout on the top-middle part of the face pattern.
-
Attach the ear patterns on the top side of the head pattern.
-
Use a gel pen or sharpie to draw the eye outlines, whiskers, and mouth line of the fox papercraft puppet.
-
Measure and cut out a piece of paper big enough to cover a TP roll. Attach the leg cutouts near the bottom side of the paper. Attach the neck fur above the legs, keeping an inch gap between the bottom end of the fur and the top ends of the legs.
-
Attach the head pattern on the top side of the neck fur pattern. The base pattern for the fox puppet is ready.
-
Cover the empty TP roll with the base pattern. Apply glue on the open sides to secure the paper.
-
Apply glue on the bottom (straight) end of the tail pattern and fold the glued part. Attach the glued part of the tail on a side of the TP roll fox pattern.
-
Allow the tail glue to dry so that the tail pattern is attached nicely.

Read NextSpring Burlap Wreath