Jewel-Framed Easter Bunny Card

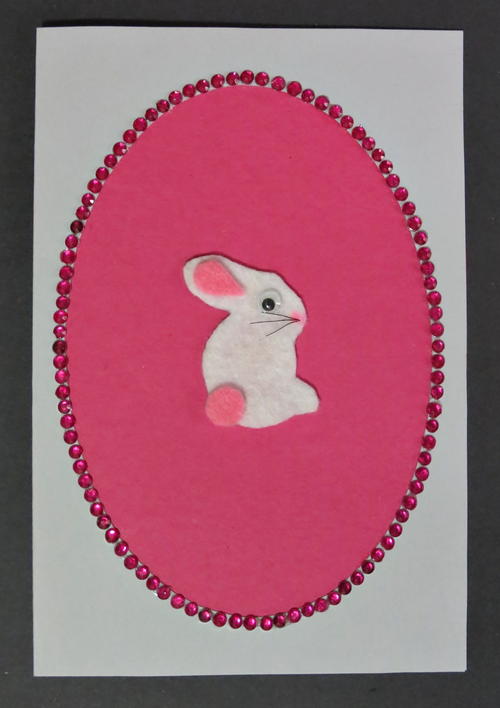
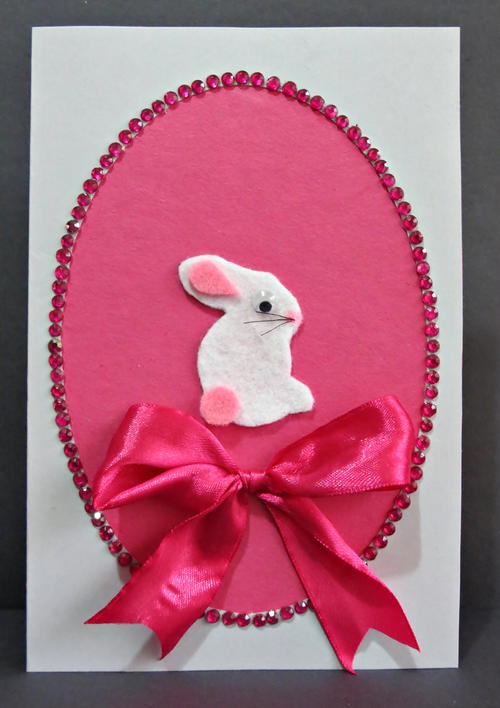
Make an Easter card with a bunny as the focus point and spread some Easter cheer. This sweet Easter bunny sits neatly in a frame made from crystal beads, and the bow beneath the bunny ensures that this friendly fella won't go unnoticed. Show your relatives that you're thinking about them this spring by sending them a DIY card for Easter. They'll love how cute the bunny is and will be impressed by your card making skills! It might be easier to just go buy a card, but homemade cards are made with love.
Estimated CostUnder $10
Time to CompleteUnder an hour
Primary TechniquePaper Crafts

HolidayEaster
Materials List
- 10" x 7.3" gray cardstock
- 7.3" x 5" dark pink sugar paper
- 7.3" x 5" light pink cardstock
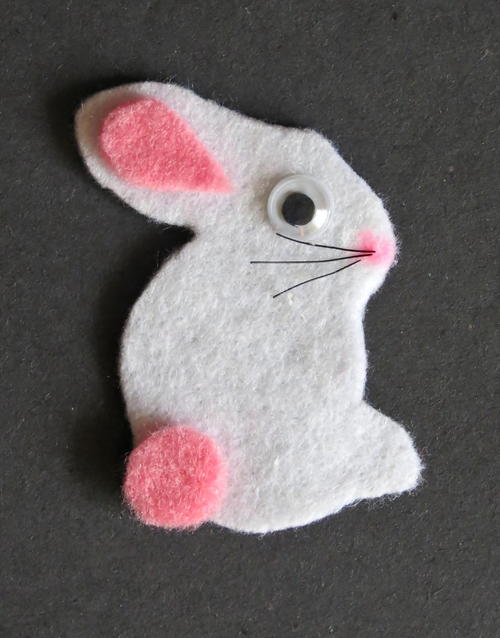
- White felt
- Light pink felt
- Small cerise pink flat back crystal beads, enough to outline the oval on the front of the card
- 1" wide cerise pink satin ribbon
- One 8mm wiggle eye
- Three short black bristles cut from a broom
- 2" high bunny cookie cutter
- 4" x 5.7" lid of oval cookie tin
- Pink felt tip pen
- Pencil
- Standard scissors
- Quick drying glue (such as Bostik Clear)
Instructions
How to Make a Homemade Card for Easter
-
Score the 10" x 7.3" gray cardstock in half to create a card sized 5" x 7.3".
-
With the fold at the left, position the lid onto the front of the card and trace all around it. Cut the oval shape out.
-
Glue the dark pink sugar paper behind the front flap of the card to the inside of the card.
-
Glue the light pink cardstock behind the sugar paper to the inside of the card.
-
Glue crystal beads all around the oval shape on the front of the card.
-
Use the bunny-shaped cookie cutter to trace a bunny onto the white felt and cut it out.
-
Cut a small circle and small teardrop from the pink felt. Glue the pink teardrop onto the bunny's ear and the pink circle onto the bunny's tail.
-
Make a small nose with the pink felt-tip pen.
-
Add the whiskers and wiggle eye.
-
Glue the bunny to the front of the card.
-
Make a bow with the satin ribbon and neatly cut the ends shorter.
-
Glue the bow beneath the bunny.
Read NextDIY Sock Bunny