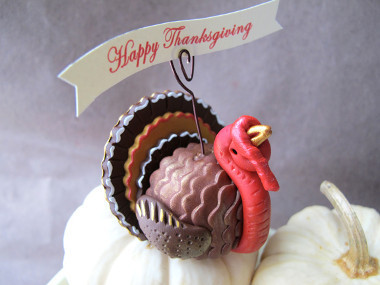
Turkey Place Card Holder
The Turkey Place Card Holder is just what you need for your Thanksgiving table decorations. As you prepare to feast this turkey day, make sure each of your guests has a place to sit with these adorable Thanksgiving name cards. The turkeys are made out of clay so you can easily craft up a bunch of these in no time at all. This craft is so cute, all your guests will be amazed when they find out you actually made it! It's truly unlike any other name card holders you've ever seen before.

Materials:
Clays:
- Premo! Accents®, 2 oz , Gold - 1 block
- Premo! Accents®, 2 oz , Bronze - 1 block
- Premo! Sculpey®, 2 oz , Pomegranate - 1 block
- Premo! Sculpey®, 2 oz , Burnt Umber - 1 block
Tools:
- Sculpey® Clay Conditioning Machine
- Sculpey Clay Tool Starter Set
- Sculpey Super Slicer
Additional Supplies:
- Scalloped round clay cutters: 2-1/2", 2",1-5/8" diameter
- Craft wire, 20 gauge
- Flat-nose pliers
- Wire cutters
- Acrylic paint: Gold, white, red, black
- Paintbrush
Instructions:
- Preheat oven to 275 °F. Test temperature with oven thermometer for perfectly cured clay. Condition all clay by kneading until it’s soft and smooth or running it through the Clay Conditioning Machine for several passes on the widest setting. Fold the clay in half after each pass and insert the fold side into the rollers first.
- Make 3" x 1/2" Pomegranate log and taper one end to make turkey head.

- Form into S-shape, curving point into spiral. Pinch end to make pointed beak, and press in line with blade tool. Make 1" thin snake for wattle (skin fold around beak), press in lines with blade tool, and press wattle on beak. Use pointed tool to make eyes.

- Make 1-3/8” oval Bronze ball for body. Flatten ball bottom, and flatten back to attach tail feathers. Using Clay Conditioning Machine at #5 setting, make 4" long Bronze sheet. Use wavy blade or scalloped scissors to cut out nine 4” scalloped strips.

- Starting at back, layer the scalloped strips around the body sides and top.

- Repeat until body is covered.

- With Clay Conditioning Machine at #2 setting, make 3" square Bronze sheet. Cut out 2-1/2" fluted circle for tail feather base. With Clay Conditioning Machine at #3 setting, make Gold sheet. Cut out 2” scalloped circle for middle feather. Place on center of tail feather base. With Clay Conditioning Machine at #3 setting, make Burnt Umber sheet. Cut out 1-5/8” scalloped circle for top feather. Place on tail feather middle layer. With blade tool, press in lines on feathers.

- With Clay Conditioning Machine at #3 setting, make Burnt Umber sheet. Cut out two wings with mini eye-shaped cutter. With tools, press in wing design.
- Use Super Slicer to slice off turkey bottom. Press head on front. Press tail feathers on back. Cut 4" wire length. Use pliers to make spiral on one end. Insert straight end into turkey. Bake 30 minutes according to instructions above. Allow to cool completely. Paint accents on tail and face.
- You can make 2 turkeys from a block of Bronze clay. Bend wire tip 90 degrees before inserting so the wire stays embedded after baking. If you're making several turkeys, do them all at once, completing each step for every turkey before moving to the next step. It's easier and faster!
Read NextThanksgiving Thankful Tree