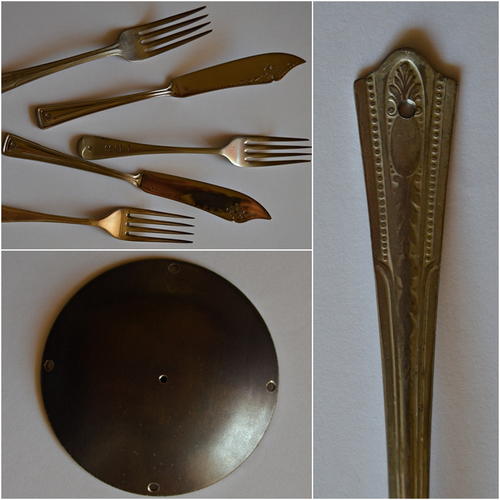
Vintage Cutlery Wind Chime
Add some vintage charm to your garden this summer with this lovely DIY idea on how to make a wind chime.

If you're looking for the absolute best way to decorate your garden this summer, then you'll absolutely love this Vintage Cutlery Wind Chime. The sound of wind chimes is always associated with happiness, so sprinkle some joy around your garden with this fantastic free holiday craft. Made with recycled and thrifty materials, this DIY garden idea teaches you how to make a wind chime that's guaranteed to make your garden or backyard stand out in your neighborhood. This charming DIY summer idea is a great way to use hand-me-down silverware that's just been sitting around in your attic or basement. If Granny's antique cutlery is too precious to part with, then this budget-friendly craft idea is a wonderful reason to hit up summer garage sales.
And this craft isn't just for the garden! This fun DIY craft is also a fantastic homemade gift idea for Nana or any other older relative and is an charming way for her to display antique silverware that everyone can enjoy. She'll love how this country craft idea reminds her of family dinners and parties from when she was growing up. However you style your garden craft, we know you'll be completely charmed with this easy tutorial on how to make your own unique wind chime.
Estimated Cost$11-$20
Time to CompleteIn an evening
MaterialsBeads, Recycled Materials, Other
Primary TechniqueDIY Craft

SeasonSummer
Project TypeMake a Project
Materials List
- Three antique silver or stainless steel forks
- Two antique silver or stainless steel fish knives
- Round silver-grey metal pole cap with a diameter of 3”
- 5 pieces of 1.5mm thick brown waxed cotton cord, each piece with a length of 38”
- Clear lucite flower bead that would fit on the pole cap
- 5 light yellow oval multi-faceted spacer beads
- 5 brown oval multi-faceted spacer beads
- 5 clear flat oval multi-faceted spacer beads
- 4 silver spacer beads
- Silver metal plated acrylic round ball bead (20mm)
- Standard scissors
- Electric drill and drill bits
- Super Glue
- Optional: Brasso Metal Polish and old cloth
Instructions
-
Drill holes with a diameter of 3mm at the end of the handle of each knife and fork.
-
Drill four evenly spaced holes around the outer edge of the pole cap, each with a diameter of 3mm
-
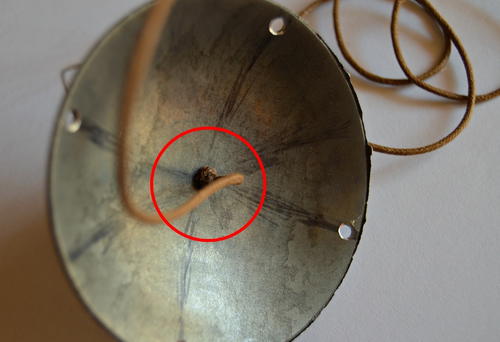
Drill a hole with a diameter of 2mm in the center of the pole cap.
-
If necessary, clean the knives and forks with a metal polish, such as Brasso.
-
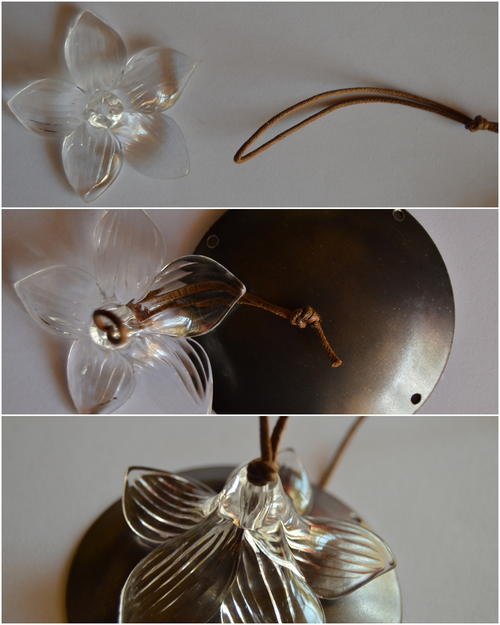
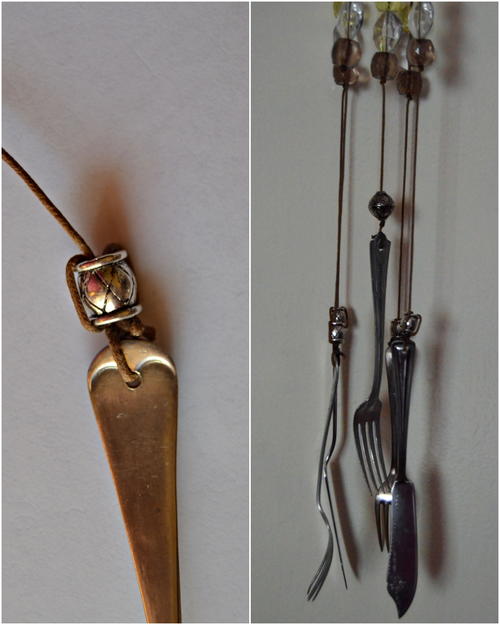
Take a piece of wax cord. Make a loop at one end and tie a knot to secure the loop.
-
Push the other end of the cord through the center hole in the pole cap and pull tight, so that the knot will be right on the pole cap. Starting at the bottom of the lucite flower bead, push the top of the loop through the bead.
-
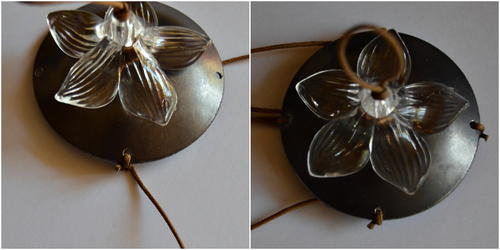
Push the lucite flower bead down on the pole cap and make a knot in the loop right above the flower bead to keep the flower bead in place.
-
Make a knot at the bottom of the pole cap, so that the flower bead will be secure.
-
Add a drop of Super Glue to each knot to secure and allow to dry.
-
Take a second piece of wax cord and secure with a knot to one of the holes around the edge of the pole cap. Do the same with the other three pieces of wax cord and the remaining holes. Neatly cut the shorter ends of the cord and add a drop of Super Glue to each knot.
-
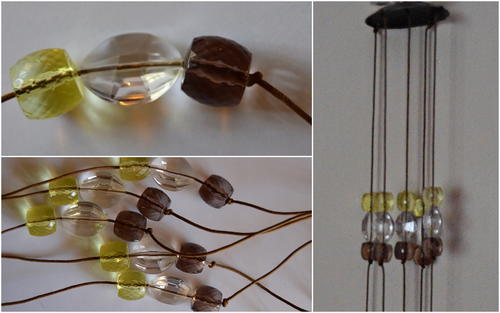
On each of the five wax cords below the pole cap, thread three beads. Start with a light yellow spacer bead, followed by a clear spacer bead and lastly a brown bead. Check that all the beads are the same distance from the pole cap and make a knot below each group of beads to keep them in place. Add a drop of Super Glue to each knot.
-
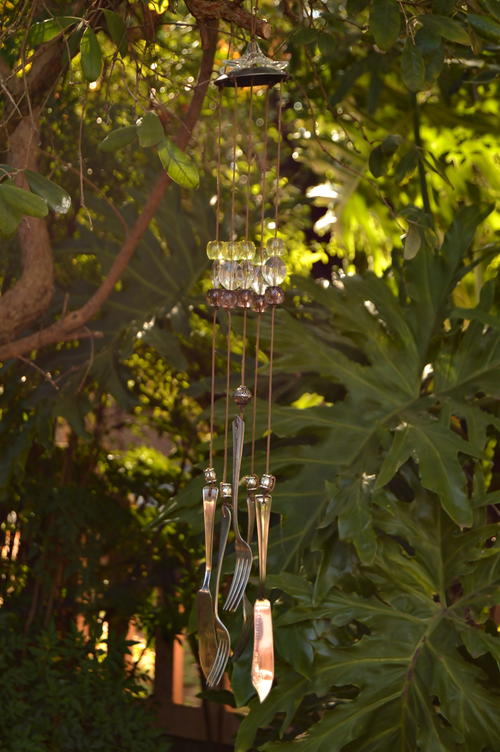
Add the silver ball bead to the center cord, and a spacer bead to each of the outer cords. Make a knot below the bead and then add a knife or fork below each bead. For the outer cord, alternate between a fish knife and a fork. If using an odd fork, place that one in the middle. Before pulling the knots tight, check that the outer knives and forks are the same height. The center fork must be slightly higher than those on the outside to be able make the sound. Add Super Glue to the knots.
-
Find a suitable spot in the garden and hang your wind chime. Enjoy listening to the soothing sounds as you relax in your garden or backyard!
How do you decorate your summer garden? Let us know below in the comments!
Read NextBeautiful Button Tree Art
Your Recently Viewed Projects

Thanks for your comment. Don't forget to share!
GreenThumbToMyElbo w
May 31, 2017
I absolutely LOVE windchimes. Great use for mismatchecd pieces at the thrift store and the beads make it soooo elegant. Simple, simple, simple but lovely.
Report Inappropriate Comment
Are you sure you would like to report this comment? It will be flagged for our moderators to take action.
Thank you for taking the time to improve the content on our site.