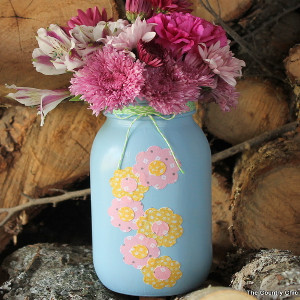
Spring Fever Party DIY Light

Celebrate the arrival of spring with these spring decorating ideas that will have your heart glowing with seasonal warmth. Use decoupage and paint techniques to turn an ordinary clear glass jar into this stunning Spring Fever Party DIY Light. Displayed with fairy lights and lemons, these lamp ideas will make eye-catching centerpieces. This lamp DIY project is a great way to turn trash into treasure! Who would have thought that a simple jar could yield one of the loveliest spring crafts of all time?
Estimated Cost$21-$30
Time to CompleteWeekend project
MaterialsPaint, Recycled Materials
Primary TechniqueMixed Media

SeasonSpring
Materials List
- Empty clear glass mayonnaise jar with a capacity of 3 liters
- Napkin with a suitable floral design in yellow
- 30" of matching ribbon
- Jute string
- Frosted glass sandblast spray paint
- Two to three alcohol pads
- Mod Podge
- Kaisercraft bronze ink glimmer mist
- Rolkem super gold dusting powder
- Quick-drying clear matt spray varnish
- Standard scissors
- Two paintbrushes
- Hairdryer
- Small plastic bowl
- Battery operated string of pure white LED fairy lights and a few lemons
Instructions
-
Remove the label, wash the jar, and allow to dry upside down overnight.
Tip: If necessary, use mineral turpentine to remove any glue residue from where the label was stuck. -
Clean the jar on the outside with alcohol pads and allow to dry.
-
Spray the jar with the frosted glass sandblast spray paint and allow to dry thoroughly.
-
Cut the design from the napkin. Remove the bottom layers from the design cut from the napkin and position the design on the jar.
-
Paint Mod Podge over the napkin design. It is best to start painting from the middle of the design towards the sides, working in small triangles. Use your index finger to gently rub out any air bubbles from the back of the design. Rub from the inside towards the outside and be careful not to tear the design. Use the hairdryer to dry the jar but do not use the highest heat setting on the hairdryer, as the jar might become too hot to handle.
-
Paint a layer of Mod Podge over the outside of the jar. The Mod Podge will protect the design and give the product a smoother finish. Dry the jar thoroughly with the hairdryer.
-
Spray some of the ink mist into the plastic bowl. Use the paintbrush to give the jar an uneven wash with the ink mist and allow to dry thoroughly.
Note: Do not paint ink mist over the design. -
Use the second dry paintbrush and the gold dusting powder to add an uneven gold shimmer to the jar, again avoiding painting over the design itself.
-
Spray the jar with the varnish and allow to dry thoroughly.
-
Tie the jute string and ribbon around the neck of the jar, make neat bows, and cut the ends of the string and ribbon shorter.
-
To display, fill the jar with lemons and a string of fairy lights.
Read NextSimple Berry DIY Spring Wreath