Pumpkin Carving 101: How to Carve a Pumpkin Like a Pro

It's not really Halloween without a spooky carved pumpkin sitting on your front porch. But, what if after all these years, you still really don't know how to carve a pumpkin. Don't worry just yet, because this Pumpkin Carving 101: How to Carve a Pumpkin Like a Pro guide is here to save the day.
You'll learn the basics of pumpkin carving, and before you know it you'll be coming up with your own unique pumpkin carving designs for tons of Halloween fun every year. Pumpkins are certainly a staple piece for any true fall decor, so don't let another year pass you by without this must-have Halloween decoration!
Did you know there are so many ways to use pumpkin guts as well? Never waste another pumpkin again without using the insides of your gourd for some truly delectable pumpkin desserts and snacks for the season. Everything you need to know for carving the perfect pumpkin and making some tasty treats is right here. Have a fun and safe Halloween by learning how to carve a pumpkin the right way!

What Tools to Carve a Pumpkin With
Don't spend tons of money on expensive tools for carving your pumpkins at home when you could probably find the necessary supplies in your kitchen already. Just because you don't have fancy equipment doesn't mean your pumpkin is doomed from the start. These tools are basic kitchen essentials that will work just as well!
- Large serrated knife - This will come in handy for cutting a hole in the top of your pumpkin and for removing any larger areas in your basic pumpkin designs.
- Ice-cream scoop - An ice-cream scoop or larger metal spoon will do wonders for scraping the inside of your pumpkin and removing all the seeds and pumpkin guts so you can begin carving. Set aside the pumpkin seeds and guts for some yummy pumpkin desserts later on!
- Nail - A nail will act as your poker tool that you'd see in pumpkin carving kits. This will be used when transferring stencil designs onto the face of your pumpkin.
- X-Acto Knife - Use an X-Acto knife for carving fine details and smaller sections of your design onto the pumpkin's face.
Pumpkin Carving Safety Tips
While pumpkin carving is a fantastic Halloween activity for families, it can sometimes be dangerous. Avoid any unexpected trips to the emergency room this year by taking extra precaution and following these pumpkin carving safety tips. Most importantly, have fun and don't take yourself too seriously! Click here to download our pumpkin carving safety guide.

Pumpkin Carving Basics: How to Begin
Choose the right pumpkin.
Choose a pumpkin that is the right shape for the design you have in mind. Large, round pumpkins may work better for more complicated designs, while tall and skinny pumpkins may be more suitable for faces. However, this is really up to you and what you think would be best for your design. Keep in mind that you'll want to choose a pumpkin with a flat bottom so it doesn't topple over. Always look out for green stems if you want your pumpkin to last throughout the month, but brown is okay too!
Cut a hole in the top.
Using your large serrated knife, cut a sizable hole in the top of your pumpkin so your hand can easily fit when hollowing out the pumpkin. Additionally, if you plan on lighting your pumpkin with a candle, cut a hole in the bottom so you can easily place your pumpkin over the candle.
Clean the pumpkin out.
This is definitely the fun part! Scrape out the seeds and pumpkin guts with your ice-cream scoop to be saved for later. Get your kids involved with pumpkin carving by making them the designated scoopers because they'll love pulling out the mushy pumpkin insides.

Carving Basic Pumpkin Designs with Stencils
- Make sure your pumpkin is dry and tape the chosen template onto the flattest side of your pumpkin, even if it's not the "prettiest" side.
- Using your nail, poke small, shallow holes through the paper template along the outlines of your design about 1/4" apart. Remove the paper.
- With your Ex-Acto knife, begin carving the smallest sections of your design. It's best to work from the middle to the outside edges so you can avoid breaking your design by resting your hand on an already carved out section.
- Light your pumpkin using a candle or tea light. If you carved a hole in the bottom of your pumpkin, simply light the candle and place your pumpkin over the candle. You can also light your pumpkin with a flameless tea light if you want to leave your pumpkin lit overnight, or if you're not going to be home for an extended period of time.
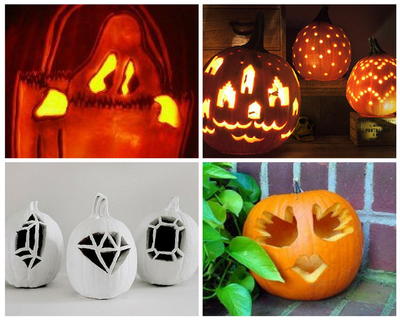
Easy Pumpkin Carving Designs to Try
What's a carved pumpkin without a creative design to make it stand out from all the rest? Try out these easy pumpkin carving ideas for a spooky pumpkin to greet all the trick-or-treaters and inspire your Halloween spirit!
Sweet Little Hands Pumpkin Carving - This pumpkin design is a great idea to get the little ones involved in this fun Halloween activity! But, remember that adults should always be responsible for the actual carving.
Crawling Spider Pumpkin Carving Template - Spiders are a must for a "spook-tacular" Halloween and you can carve a creepy, crawly spider on your pumpkin with this easy design template.
The New Classic Jack-o'-Lantern - Get creative with this pumpkin carving design by combining the old and new for a completely modern pumpkin. Best of all, there's no set pattern so make your pumpkin as simple or as intricate as you like!
Gem-O Lanterns - Want something a little more outside the box? Try these jeweled pumpkins for a creative carving design with a "dazzling" twist.
Creepy Tree Pumpkin Carving Pattern - Halloween is all about ghosts and graveyards, so try your hand at this sinister tree template for a frightful pumpkin design.
Easy Ghost in a Bag Carving Template - "Boo!" This friendly ghost pattern is cute and easy enough for your little ones. Plus, it will look great on your doorstep for Halloween night!
Must Make Illustrated Carved Pumpkins - While this pumpkin carving design is a little different than all the rest, you won't regret trying out this decorative pumpkin idea if you're feeling up for something totally new this year.

How to Carve a Pumpkin and Use the Insides
While you could just throw out the pumpkin insides, why not learn how to store your pumpkin flesh for some palatable treats and snacks! Make some homemade pumpkin puree to be used in all sorts of recipes from yummy pumpkin pie to pumpkin cookies. Get your creative pumpkin juices flowing and don't let an ounce of your pumpkin go to waste with some delicious pumpkin dessert recipes.
To use your pumpkin seeds, try out this baked pumpkin seeds recipe for a standard autumn snack food that's delicious and nutritious. Coat your seeds in the customary olive oil and salt for easy added flavor that will leave you wondering why you never tried this before!
"You can also experiment with different seasoning combos like cinnamon sugar, homemade taco seasoning mix, or go for something savory with a bit of rosemary." - Janel, A Mom's Take
Learn how to prepare a pumpkin from scratch for making homemade pumpkin puree. You can use a whole pumpkin or even a jack-o-lantern as long as it hasn't been sitting out for days.
"Some people think that boiling their pumpkin is how you prep for future use. When you do this you lose a lot of the pumpkin flavor. By roasting it you deepen the sweetness of the meat and reduce the moisture content."
- Cindi, A Mom's Take
Read NextMesh Pumpkin Door Decor