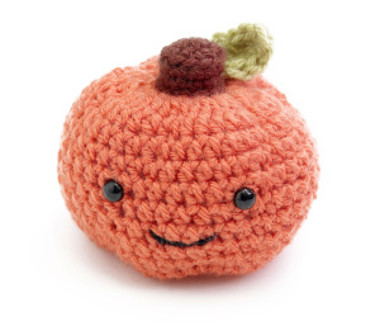
Cute as a Button Happy Pumpkin
If you're looking for pumpkin craft ideas to start making, then the Cute as a Button Happy Pumpkin is just what you need to make. This adorable crochet pumpkin is just too cute to pass up. With this tutorial you can learn how to make Halloween decorations that you'll be proud to show off. Set this little guy up on a windowsill, mantle, or a table for some extra holiday flair. Once you make this happy pumpkin, you'll decorate with it year after year. Feel free to get creative and make multiple pumpkins and create a fun table centerpiece.

Materials:
- Vanna's Choice Baby Yarn: Goldfish
- Vanna's Choice Baby Yarn: Chocolate Cake
- Vanna's Choice Baby Yarn: Sweet Pea
- Lion Brand Crochet Hook - Size G-6 (4 mm)
- Lion Brand Split Ring Stitch Markers
- Lion Brand Large-Eye Blunt Needles (Set of 6)
Additional Materials:
- 2 plastic safety eyes, 12 mm diameter
- Small amount of black yarn
- Fiberfill stuffing
Instructions:
Gauge:
- Exact gauge is not essential to this project.
Stitch Explanation:
- sc2tog (sc decrease) Insert hook into st and draw up a loop. Insert hook into next st and draw up a loop. Yarn over, draw through all 3 loops on hook – 1 st decreased.
- sc3tog (sc decrease) Insert hook into st and draw up a loop. (Insert hook into next st and draw up a loop) twice. Yarn over, draw through all 4 loops on hook – 2 sts decreased.
Notes:
- Work in continuous rnds; do not join or turn unless otherwise instructed.
Pumpkin:
- With A, ch 2.
- Rnd 1: Work 6 sc in first ch; place a marker to indicate beg of rnd; move marker up as each rnd is completed.
- Rnd 2: Work 2 sc in each st around – 12 sts.
- Rnd 3: *2 sc in next st, sc in next st; rep from * around – 18 sts.
- Rnd 4: *Sc in next st, 3 hdc in each of next 2 sts; rep from * around – 42 sts.
- Rnds 5-13: *Sc in next st, hdc in each of next 6 sts; rep from * around – 42 sts. Following package instructions, attach safety eyes. Begin stuffing, continue stuffing as work progresses.
- Rnd 14: *Sc in next st, (sc3tog) twice; rep from * around – 18 sts.
- Rnd 15: *Sc2tog, sc in next st, rep from * around – 12 sts.
- Rnd 16: *Sc2tog, rep from * around – 6 sts. Fasten off.
Stem:
- With B, ch 2.
- Rnd 1: Work 6 sc in first ch; place a marker to indicate beg of rnd; move marker up as each rnd is completed.
- Rnd 2: 2 sc in each st around – 12 sts.
- Rnd 3: Working through back loops only, sc in each st around.
- Rnd 4: Sc in each st around. Fasten off.
Leaf:
- With C, ch 4. Work 2 dc in 2nd ch from hook, hdc in next ch, 3 sc in last ch; working along opposite side of ch, hdc in next ch, 2 dc last ch. Fasten off.
Finishing:
- Lightly stuff Stem and sew to top of Pumpkin. Sew Leaf to side of Stem. Weave in ends.

Read NextDay of the Dead Garland
Your Recently Viewed Projects
Thanks for your comment. Don't forget to share!
flowergirl
Sep 15, 2018
I enjoy crotchet projects for the fall and winter so much more than any other season. Halloween will be upon us soon and before it passed I'd love a cute crotchet pumpkin like this one just to put me in the holiday mood. Love how simple the stitches are for this project, it just comes together really well.
Report Inappropriate Comment
Are you sure you would like to report this comment? It will be flagged for our moderators to take action.
Thank you for taking the time to improve the content on our site.