A Very Ghostly Ornament
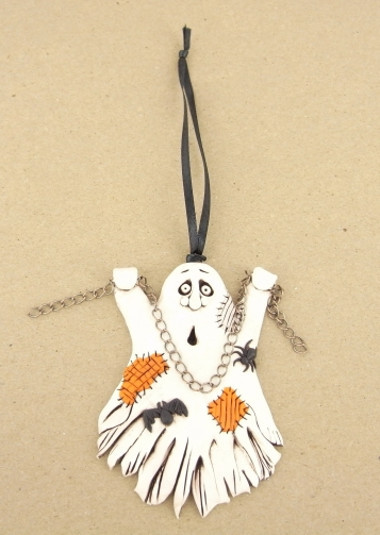
DIY Halloween decorations add personality and originality to your holiday home decor. This year, learn how to make Halloween decorations that you will put up year after year. A Very Ghostly Ornament is perfect to hang from a window as a frightful decoration for guests. With this tutorial, you'll see how easy it is to create such a cute ghost craft. In fact, it's so easy, you'll want to make multiple homemade clay ornaments to hang throughout the house. Don't worry though, this little ghost won't scare off all your trick-or-treaters.
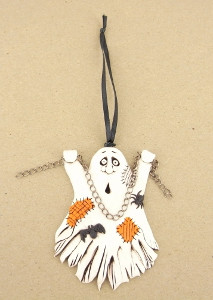
Materials:
Clays:
- Sculpey® III, 2 oz , Black - 1 block
- Sculpey® III, 2 oz , Sweet Potato - 1 block
- Sculpey® III, 2 oz , White - 1 block
- Sculpey® III, 2 oz , Elephant Gray - 1 block
Tools:
- Sculpey® Clay Conditioning Machine
- Sculpey Clay Tool Starter Set
- Sculpey Style and Detail Tools, Set of 3
- Sculpey Super Slicer
Additional Supplies:
- One 6 ½” length of any chain link
- 20 Gauage Wire- 1 ½” Length
- Black Ribbon-1/8” thick-5” Length
- Dark Burnt Umber Acrylic Paint
- Needle Nose Pliers
- Wire cutters
- Paintbrush with stiff bristles
- Kitchen sponge or soft rag/cloth
Instructions:
- Do not use unbaked clay on unprotected furniture or finished surfaces. Start with clean hands and work surface area. Good work surfaces include wax paper, metal baking sheet, or disposable foil. Knead clay until soft and smooth. For best results, clean your hands in between colors. Shape clay, pressing pieces together firmly. Bake on oven-proof glass or metal surface at 275 °F (130 °C) for 15 minutes per 1/4” (6 mm) thickness. For best baking results, use an oven thermometer. DO NOT USE MICROWAVE OVEN. DO NOT EXCEED THE ABOVE TEMPERATURE OR RECOMMENDED BAKING TIME. Wash hands after use. Baking should be completed by an adult. Begin by preheating oven to 275 °F (130 °C). Test temperature with oven thermometer for perfectly cured clay. For best results, condition all clay by running it through the clay dedicated pasta machine several passes on the widest setting. Fold the clay in half after each pass and insert the fold side into the rollers first.
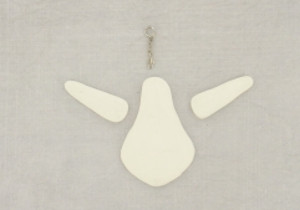
- To Make the Ghost Using 1/4 bar of White clay, form the ghost body by flattening and shaping the ghost figure, about 3 ½” long by 2” wide. Form the arms by making two balls of White clay about ½” round. Shape them into tear drops about 1 3/8” long and flatten. Using needle nose pliers bend and twist the 1 ½” length of wire to form a loop. Push the metal loop into top of head and press clay down and smooth. Attach the arms on each side of body about 1” below top of head and smooth the pieces into the body with your fingers
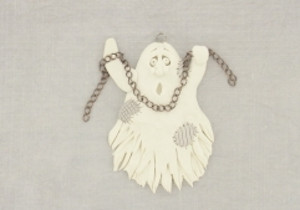
- Lay the chain about ¼” down on hand leaving about 1 ½” of chain to dangle. Add a small drop of Bake & Bond to the hand to secure the chain. Fold the top part of the hand over to cover it. Repeat on other side. Lift the middle section of the chain up over the ghost’s head for baking. Using the Clay Knife, make cuts, lines, and indentations on lower edge of ghost figure to give a “tattered” look. Use the Clay Knife to cut two slanted “eyebrows” in forehead. Use the 6mm ball from Style and Detail Tools to carve eye sockets. Form two 1/8” round balls of White clay and add to sockets for eyeballs. Use the Needle Tool to poke dots in eyes for pupils. Form another 1/8” round ball of White clay into a tear drop shape. Form two 1/16” round balls for the nostrils. Place a small drop of Bake & Bond between the eyes and add the nose and nostrils, press lightly. Use 6mm ball from Style and Detail Tools to shape an oval “wailing” mouth. To Make the Patches: Pinch off a small amount of Elephant Grey and White. Mix completely to get a lighter color. Pinch off another small amount from Sweet Potato. Run the colors separately through the Clay Conditioning Machine on the #5 setting (run the lightest color through first to avoid color transfer). Use the Clay Knife to cut irregular shaped pieces from the Grey and Sweet Potato sheet. Place one patch on the neck, one on the left side and one on the right side of the ghost. Use the Clay Knife to texture patches with stripes and checkers. Using the tip of the Knife, make tiny cuts around the patch to mimic stitching.
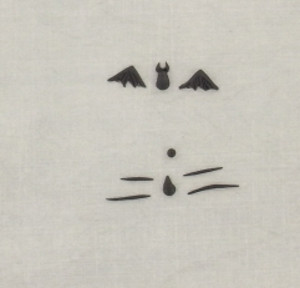
- To Make the Spider Form a ball 1/8” ball of Black clay, flatten it into a teardrop shape. Pinch off a small amount of Black clay and roll out a very thin snake. Cut off eight 1/8”pieces and attach to the body. Curve the legs to mimic an actual spider. To Make the Bat Form three balls of 1/8” ball of Black clay. Flatten one into a teardrop shape for the body. Form the other two into triangles for the wings. Use the Clay Knife to cut out notches in the triangles to mimic wings. Press the wings onto the body. Add a dab of Bake & Bond to the pumpkin and adhere the bat. Pinch a tiny amount of clay and shape them into tiny teardrops for the ears. Gently press them on to the bat’s head. Add some Bake & Bond to the ghost and add the spider and the bat to the ghost’s body.
- Bake according to the manufacturer’s directions.
- ADDING AN ANTIQUED LOOK: Once the piece has cooled, use the paintbrush to apply the Burnt Umber Acrylic Paint to the entire piece, except for Black clay areas. Quickly (before the paint dries), use a dampened sponge or soft cloth to remove the paint from the surface of the clay. You want the paint to remain in the holes, cracks, crevices, stamped, and carved areas—this will add depth and accent the textures of your piece. Add some ribbon for hanging and your Halloween tree ornament is finished and ready to hang!
Read NextDay of the Dead Garland

