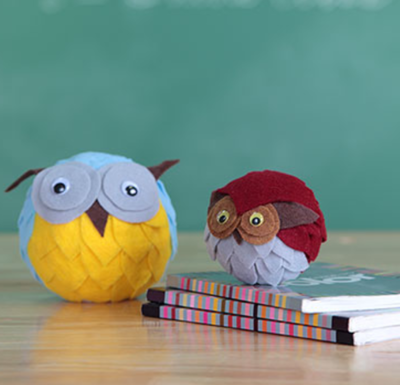
What a Hoot Felt Owls

These What a Hoot Felt Owls are a great craft for you and your kids to make together because they're so cute and they're very easy to put together! Make your owl craft vibrant with an array of colored felt that will make your owl especially bright. These cute little owls are great for autumn home decor or even for your kids to play with. These rounded owls are a hoot to make and they can be used for many different occasions including baby showers and birthday parties! Just switch out the felt colors to match the event for an adorable addition to any celebration or gift.
Estimated CostUnder $10
Time to CompleteIn an evening
Primary TechniqueGeneral Crafts

Materials List
- Aleene's® School Tacky Glue (32295)
- Foam ball
- Googly eyes
- Fabric scissors
- Felt (various colors)
Instructions
-
Cut off the bottom of your foam ball to create a flat edge that your ball can sit on. You may need to cut or shave off approximately ¼ inch of the ball.
-
Begin by cutting your felt into petal shapes for the feathers. You can use one color or many colors to create the feathers. Tip: You will need approximately 60 petals to cover an 8” foam ball.
-
Starting at the flat portion at the bottom of the ball, begin gluing felt feathers around the ball, making sure to overlap the sides slightly to provide the best coverage. Begin another row of feathers just above the first row, overlapping the rows in the same manner as fish scales. Refer to photo. Continue doing this until you cover the ball completely.
-
Using another felt color, cut out two large circles and two slightly smaller circles for the eyes. Glue the smaller circles on top of the larger circles. In the center of the smaller circles, glue a googly eye. Allow the eyes to dry for approximately twenty minutes before gluing to the owl.
-
Cut out a small triangle and two long skinny triangles. These will become the beak and the ear tufts. Glue the beak in the center of where you want the owl’s face to be. Next, glue the eyes directly above and on either side of the beak, overlapping the beak slightly.
-
To create the ear tufts, add a dab of glue to the widest edge of the triangle and tuck behind the eyes.
-
Allow your owl to dry for approximately for time recommended on bottle.
Read NextHow to Make Pom Pom Hedgehogs