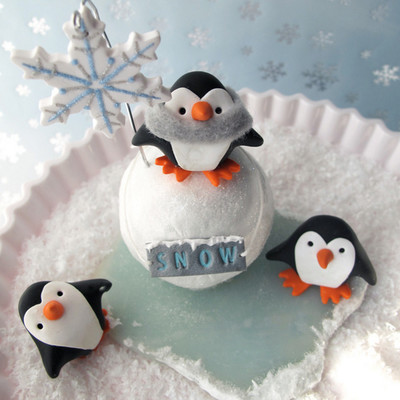
Cutest Penguin Sculpture Ever
Learn how to make the Cutest Penguin Sculpture Ever to add a fun accent to your winter decorations this year. You will create a DIY winter wonderland for your clay penguins to playfully be positioned upon. The bright colors of their little orange feet and beaks will stand out against the white and blue background of the sculpture. You will be unable to resist how absolutely adorable this craft is, so be sure to immediately add it to your list of cute penguin crafts this winter.

Materials:
- Sculpey® III, 2 oz , Black - 1 block of clay
- Sculpey® III, 2 oz , White - 1 block of clay
- Sculpey® III, 2 oz , Just Orange - 1 block of clay
- Premo! Sculpey®, 2 oz , Turquoise - 1 block of clay
- Premo! Accents®, 2 oz , White Translucent - 1 block of clay
- Model Air®, 2 oz , White - 1 block of clay
- Sculpey® Clay Conditioning Machine
- Sculpey Acrylic Roller
- Sculpey Style and Detail Tools, Set of 3
- Sculpey Super Slicer
- White, blue, and black craft paint
- Paintbrush
- Wire cutters
- Jewelry pliers
- Small snowflake cutter
- White string
- Fine glitter
- Aileen's True Snow
- Blue and silver 3-D paint
- White craft glue
- Blue and gray felt
- Smooth foam ball with a 2" diameter
- Exacto knife
- Toothpicks
- Ceramic tile
Instructions:
Note: Good work surfaces include wax paper, a metal baking sheet, a ceramic tile, or disposable foil. Knead the clay until it is soft and smooth. Bake your clay on oven-proof glass or a metal surface at 275 °F for 30 minutes per 1/4mm in thickness. For best baking results, use an oven thermometer. Begin by preheating your oven to 275 °F. Condition all clay by running it through the clay dedicated pasta machine (or your Sculpey® Clay Conditioning Machine) several passes on the widest setting. Fold the clay in half after each pass and insert the fold side into the rollers first.
- Create this step a day ahead to leave enough time for the piece to dry and harden. Take a piece of the White Polyform Model Air, and roll out a thin layer with your acrylic roller. Cover your 2” smooth foam ball with this layer. Press firmly with your fingers. Insert a toothpick into the top of the ball. Set it aside to dry for at least twenty-four hours.

- Mix together ¼ of a bar of White and Turquoise clay. With the Clay Conditioning Machine on the #6 setting, create a sheet. From the sheet, cut a free form “ice flow” shape with your Exacto knife.

- With the Clay Conditioning Machine on the #1 setting, create a sheet of White Translucent clay. Make sure the sheet is large enough to cover the free form shape. Cut two free form shapes just a little larger than the turquoise and white shape. Sandwich the free form shape between the translucent shapes then cut it out.
- Place it on the tile and bake it as directed above. Prepare a bowl of ice water and place your ice base directly into the water right after it comes out of the oven for 30 minutes. This will enhance the translucence of the clay.
- Once your ice base is baked and cooled, figure out where you want to place your snowball on the base. Make a little hole with your Exacto knife. Glue a toothpick in it to support the snowball when it is attached to the base.

- Once the snowball is dry, paint it white. Then, add a coat of glue and a dusting of glitter. Glue it to the ice base. Let it dry.
- Use a toothpick to create a little snow frost on your ice base using 3-D snow paint (like Aleene’s True Snow). Before the paint dries, add a dusting of glitter. Set it aside to dry.

- To make the body of the penguins, roll a black oval approximately 1”. Press down on one end of the oval so it will stand by itself. With your fingers, lightly sculpt out your penguin’s tail and two wings by pulling the clay and squeezing.

- To create a penguin looking up, just press the top of the oval with your finger back towards the tail to the angle you want.

- With the Clay Conditioning Machine on the # 3 setting, roll ¼ of the Orange bar into a sheet. Use the mini-metal hand cutter from the Premo! Baby Set to cut out your penguin’s feet. Remove the pointer finger and thumb of the hand with an Exacto knife so that the penguin will have three toes. Note: If you don’t have the mini hand cutter, you can just cut out feet shapes with a knife.

- With the extra orange clay roll a small cone shape for the beak.

- With the Clay Conditioning Machine on setting #5, create a sheet of White clay from ¼ of the bar. Cut out a long and thin paper heart template approximately 1 ¼" tall for the penguins’ body. You can also cut out the shape by hand.

- Add your white, heart-shaped clay to the front of your penguin so the bottom of the heart wraps under the body.
- Add the two orange feet to the bottom.
- Create two eyes with your stylus tool.
- Before you attach the beak, cut a small piece of toothpick and cover the end with the Bake and Bond and insert it into the face. Attach the orange beak to the toothpick.

- Use the extra toothpick to create a hole in the bottom of the penguin you want to sit atop of the snowball.
- Place your penguins on a ceramic tile and bake them as directed above. Once baked and cooled, dip the tip of a toothpick in black paint and paint the penguins’ eyes. You can also embellish your penguins by adding a felt scarf.

- With the Clay Conditioning Machine on setting #1, create a sheet of White clay. Use a small snowflake cutter to cut out the shape and add a small hole to it so it can be hung with wire.
- Place your snowflake on your tile and bake it as directed above. Once baked and cooled, decorate it with blue and silver 3D paint and brush it with glitter. Finally, attach it to silver 18-gauge wire.

- With the Clay Conditioning Machine on the #3 setting, create a sheet of Silver clay. Use the Sculpey Alphabet Stamper to make the word “SNOW”, and cut it out with the Super Slicer blade. Add two holes on each end to add string and attach to the snowball.
- Place the word on your tile and bake it as directed above. Once cooled, you can paint the words and add 3D snow to the top. Add string and tie it to the snowball.
- Once the pieces are cooled and all the details are added, glue the penguin you want to sit atop the snowball onto the toothpick. Put the snowflake on the wire and tie the "SNOW" sign around the ball. You can glue the other two penguins around the base or leave them unglued so you can move them around.

Read NextIcy Snowflake DIY Candle Holder