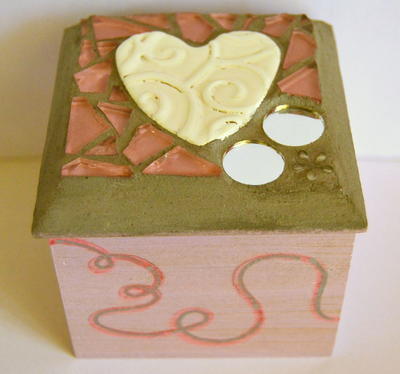
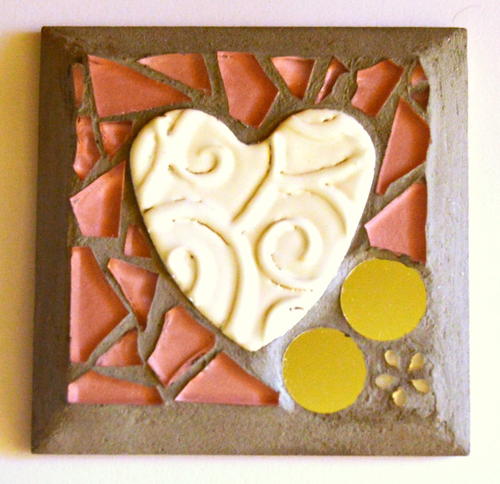
Pure Love Mosaic DIY Box

Celebrate the month of love with this darling little DIY storage box that can be used to store all your special trinkets. Use mosaic skills, soft hues of pink, and a white heart tile as the focus point of this Pure Love Mosaic DIY Box to make sure that your message of love is not lost. Fill this box craft with a special gift, such as a heart-shaped chocolate, and make your Cupid appreciate you even more. With this beautiful trinket box DIY project, the possibilities are endless. Enjoy the treasure that is true love!
Estimated Cost$31+
Time to CompleteWeekend project
MaterialsPaint, Wood
Primary TechniqueMosaics

SeasonWinter
HolidayValentine's Day
Materials List
- 2.6" x 2.6" square natural wooden trinket box
- 6-8 metallic pink 20mm mosaic tiles
- 1.5" high white heart tile
- 2 round mirror shapes
- 1 silver rhinestone flower
- Mother of pearl rose colored acrylic paint
- Light gray grout
- Clear-drying wood craft glue
- Quick-drying clear matt spray varnish
- Giotto decor textile neon pink pen
- Pilot silver marker pen
- Cotton ear buds
- Fine grit sanding paper
- Mineral turpentine
- Safety glasses
- Double-wheel mosaic tile cutter
- Paintbrush
- Pencil
- Old soft cloth
- Few sheets of old newspapers to protect the working area
- Small plastic container and a spoon
Instructions for Making the Lid
-
Paint the top of the lid with an even layer of mother of pearl rose colored acrylic paint and allow to dry thoroughly. Apply a second coat if necessary. Turn the lid over and also paint the bottom of the lid. Allow to dry before continuing.
-
Center and glue the white heart tile to the top of the lid.
-
Glue the two round mirror shapes and the rhinestone flower in the bottom right corner.
-
Use the tile cutter to cut the mosaic tiles into smaller shapes. To make the lid more interesting, use tiles cut to different sizes and shapes. Fill the space around the heart with the cut mosaic tiles. You only need enough glue to hold the tile in place, so use a small drop of glue to secure each tile.
-
Allow the glue to dry thoroughly before proceeding with the next step. In cold weather, it is usually best to wait overnight to allow the glue to dry thoroughly. When the glue is completely dry, you will not be able to move the tiles or the heart any more.
-
Now it is time to grout. Add a few heaped spoonfuls to the plastic container and then add a few drops of cold water until the grout is the right consistency - the grout should not be runny.
-
Use your finger to spread the grout in between the tiles and around the heart, gently pressing the grout in between all the tiles, carefully ensuring not to leave any air pockets below the grout. Only use a little bit of grout at a time. You do not want grout on the heart, mirror shapes or rhinestone flower.
-
Use ear buds to gently remove any excess grout from your tiles, heart, mirror shapes and rhinestone flower.
-
Allow the box to dry for a minimum of twelve hours.
-
Lightly sand the hardened grout to create a smooth surface.
-
Apply a coat of varnish over the mosaic effect. Use dry ear buds to gently wipe away any varnish from the tiles, heart, mirror shapes and rhinestone flower, and then allow the lid to dry thoroughly.
-
Once dry, dip ear buds into turpentine and clean any residue of varnish that might still be on the tiles, heart, mirror shapes and rhinestone flower.
-
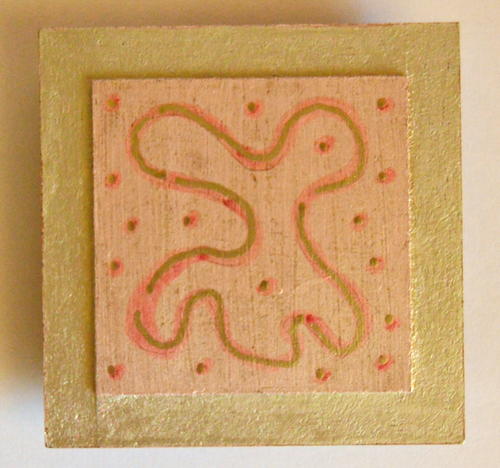
Turn the lid over and use the pencil to draw a pattern on the bottom. Then, use the neon pink pen to draw over the pencil lines.
-
Use the silver pen to add a silver border around the bottom of the lid.
-
Give the bottom of the lid a quick coat of varnish and allow to dry thoroughly.
-
Add some broken silver lines over the neon pink lines and add a final coat of varnish to the bottom of the lid to complete the lid.
Instructions for Making the Bottom of the Box
-
Paint the whole bottom of the box, inside and out, with an even layer of mother of pearl rose colored acrylic paint and allow to dry thoroughly. Apply a second coat if necessary.
Note: Do not paint the outer bottom of the box. -
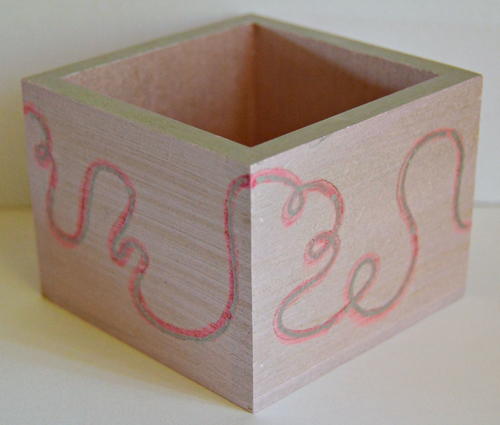
Use the pencil to draw a trellis pattern around the outer sides of the bottom. Then, use the neon pink pen to draw over the pencil lines.
-
Give the bottom of a lid a quick coat of varnish and allow to dry thoroughly.
-
Add some broken silver lines over the neon pink lines. Also use the silver pen to color the top edge of the box’ bottom and allow to dry.
-
Add a final coat of varnish to the bottom of the box.
-
Wait twelve hours before putting the lid onto the bottom of the box.
Read NextValentines Topiary Tree