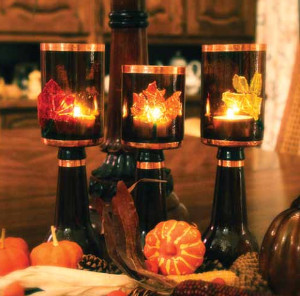
Fall Harvest Votives
You won't believe how these Fall Harvest Votives are made. The free stained glass pattern is transformed into a beautiful, decorative candle votive. This project is made using old glass beer bottles. With a glass cutter, the neck of the bottle is removed and used as a stand. This is just crazy enough to work. We love the way this glass craft comes together into a votive. Be sure to try out this tutorial so that your fall decor is on top of the "being green" trend.
Materials:
• Generation Green (g2)™ Bottle Cutter
• 1 pkg. – 5oz Jennifer’s Mosaic™ Assorted Cathedral Glass Chips
• Jennifer’s Mosaic™ Wheeled Glass Nippers
• Stained Glass Foiling Tape - 1/4” Copper/Black-Lined
• Clear Silicone Adhesive
• Three long neck brown bottles
• Leaf Pattern
• Tape
• Glass Cleaner
• Soft Cloth
• Votives – flameless or conventional
Instructions:
Read and carefully following the instructions contained within the Generation Green (g2)™ bottle cutter manual.
1. Clean and remove the labels from 3 longneck beer bottles. Measure and mark all three bottles, from the bottom one at 3 ¾”, one at 3 ½” and one at 3”. Score at marks and separate the bottles following bottle cutter instructions. Polish all at the separations.
2. Adjust the size of the pattern to fit on the side of the bottle and print (votive base). Cut out one leaf and tape it on the interior of the votive base so that the image is facing out. Continue this step on the remaining two votive bases. Set the bases side by side to view the alignment of the leaves. Once satisfied with placement of your patterns, you are ready to start applying the stained glass.
3. Nip the stained glass chips into small pieces with a wheeled glass nipper. Apply a small amount of adhesive to the back of each piece and press onto the surface of the votive base to fill the leaf pattern. Continue this process on the remaining bases. NOTE: Round objects can be challenging to mosaic. Work on a bag filled with rice or dried beans. Allow the glue to dry per the manufacturer’s recommendation.
4. Remove the patterns and tape from the inside of the votive holders. Clean all of the glass with window cleaner and dry with a soft cloth.
5. To finish the edges of the cut bottles, use copper foil tape. Pull a length of tape from the spool and remove the backing paper. Position the glass on the sticky side of the tape, centering the cut rim of the glass on the foil. Fold the foil over the rim and burnish (gently press) the tape to the glass using a fid or the edge of a pencil. This will secure the tape to glass. Apply an additional piece of foil around the rim. Apply the base band using the same technique. Burnish each application of foil. NOTE: Apply foil as shown in the photo or any other design combination. Try multiple rows, squares, diamonds, dots, or any combination thereof.©2012 Diamond Tech • Tampa, FL • 813-806-2923 • 800-937-9593 • www.diamondtechcrafts.com
6. Place the embellished votive holder on a flat surface with the open side down. Apply a bead of silicone adhesive to the bottom center. Place the neck of the bottle into the adhesive (narrow opening down) and allow to dry per the manufacturer’s instruction.
7. Once dry turn votives over, insert a candle into each holder, viola a beautiful autumn glow.
Read NextBack to School Wreath


Thanks for your comment. Don't forget to share!
Laura P
Aug 22, 2016
These are so beautiful! These DIY votives would be great for a fall mantel!
Report Inappropriate Comment
Are you sure you would like to report this comment? It will be flagged for our moderators to take action.
Thank you for taking the time to improve the content on our site.