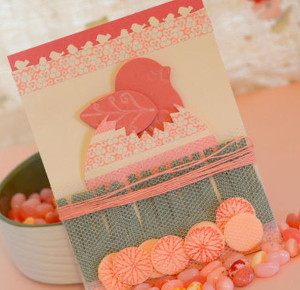
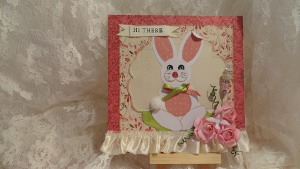
Punchy Easter Bunny Card
How adorable is the little rabbit on this handmade Easter card? Can you believe he was created from ordinary paper punches? You can learn how to make your own Punchy Easter Bunny Card just by following this step-by-step tutorial. This is one of those Easter crafts you'll love putting together; it's so much fun to create something super cute out of basic craft supplies! Hop into creativity this spring with this unique Easter paper craft from designer Carlene Eshelman.
Materials:
- 5 1/2” x 11” cardstock for base
- 5 ½” square scrapbook paper
- 4 ¾” square scrapbook paper
- Spellbinders blossom three dies
- Ivory and green scrap piecs
- 7” ivory lace
- Prima dry sand chalk ink
- Tape adhesive
- Liquid glue
- 3 flowers
- 1 small bird
- Black ink pad
- “hi there” stamp sentiment
- ¼” hole punch
- Small bow
- Small 1/2” cotton ball
- Glue dots
- 1 ¼” circle punch
- Large oval punch
- Small oval punch
- 1 ½” scallop circle
- 1” circle punch
- ½” circle punch
- White cardstock scrap
- Black cardstock scrap
- Pink cardstock scrap
- White fine tip marker
- Black fine tip marker
Instructions:
1. Fold 5 ½” x 11” cardstock in half for card base.
2. Glue 5 ½” square to front of card base.
3. Glue 4 ¾” square to front of card.
4. Place ivory and green scrap piece together. Green should be glued to bottom of ivory piece.
5. Cut out bloom diecut using ivory/green paper. Green should be on bottom of die cut.
6. Punch 1” circle and punch using pink scrap paper. Punch small oval twice using same paper.
7. Punch circle scallop with white cardstock scrap. Punch 2 small ovals with white scrap, 2 large ovals, 2 ½” circles and one 1 ¼” circle.
8. Glue pink 1” circle to scallop circle. Place in center.
9. Glue small pink ovals on top of white large ovals for bunny ears.
10. Glue ears to back of white 1 ¼” circle. Bend one ear at top.
11. Using ¼” circle punch, punch out, one pink, and two black circles.
12. Glue two ½” circles to middle of bunny face.
13. Glue ¼” pink circle to middle of face for nose.
14. Glue black circles to top of bunny cheeks for eyes.
15. Glue small bow to bunny where head and body connect.
16. Glue two white small ovals to bottom of bunny, creating a “V” for feet.
17. Use chalk ink to edge all pieces.
18. Glue bunny to your card in center.
19. Glue cotton ball to side of bunny for a tail.
20. Glue lace to bottom of card. Trim excess.
21. Glue flowers to right edge.
22. Glue bird on top of flowers.
23. Stamp sentiment onto scrap piece of ivory paper.
24. Cut 1” longer on both sides of ivory paper. Cut a “V” in ends.
25. Fold edges and glue to top left of card.
26. Draw white dot for eyes onto black circles.
27. Draw freckles and whiskers with black marker.
28. Place flower pin into flowers (optional).
Video:
Read NextEaster Gift Tags