Chevron DIY Gift Bags
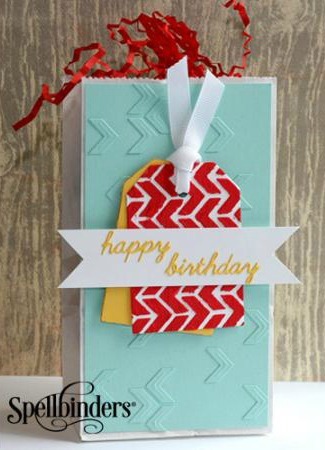
Giving a gift is always a wonderful gesture, but to really go the extra mile, you’ll need some DIY gift wrapping to put your own personal touch on a present. These Chevron DIY Gift Bags have a fresh, trendy, and colorful look that is sure to wow the recipient of your gift. Paper crafts like these truly make a big impact! This homemade gift bag is the perfect way to say “Happy Birthday” to someone you love.
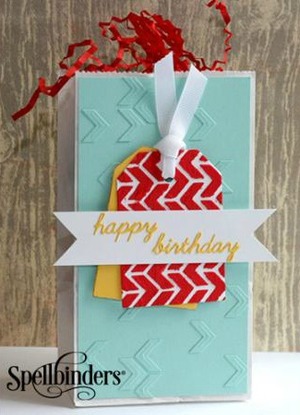
Materials:
- S2-139 Sentiments 3
- S4-455 Chevron Border
- SCD-010 Build-a-Tag One
- Spellbinders® Grand Calibur® Die Cutting and Embossing Machine
- Faber-Castell® Design Memory Craft®: Palette Knife, Whipped Spackle and Gelatos® (Red Cherry)
- Scrapbook Adhesives by 3L®: Crafty Power Tape, 3D Foam Squares and Dodz™
- WorldWin Papers: White Cardstock
- Red Cardstock
- Yellow Cardstock
- Blue Cardstock
- Ribbon
- Mini Paper Sack
Instructions:
- Trim the blue cardstock to 3¼ x 6¼”.
- Cut/emboss Chevron Border die with a piece of blue cardstock, using the Grand Calibur Machine.
- Use the Chevron Border die cut as a guide, lay it onto the blue cardstock and randomly fill in a few of the negative pieces. Adhere to the front of the bag with Crafty Power Tape.
- Cut off a small chunk of Design Memory Craft® Red Cherry Gelato® and mix with Whipped Spackle until desired color is achieved (add more red, if needed).
- Use the same Chevron Border die cut as a stencil by spreading a thin layer of the Whipped Spackle on to a piece of white cardstock.
- Remove the Chevron Border die cut. After a few minutes of drying, place your border die cut down to continue the pattern, until the surface is covered. Set aside to dry.
- Cut/emboss once dry, using Build-a-Tag One Tag Die.
- Using the same Tag Die, cut/emboss with a piece of yellow cardstock through the Grand Calibur Machine.
- Adhere the two tags together at an angle with the yellow behind, and punch a hole through the top.
- String white ribbon through and adhere to the bag using 3D Foam Squares.
- Cut the “Happy Birthday” sentiment dies from yellow cardstock
- Adhere them to a piece of white cardstock with both ends trimmed to a V.
- Adhere to the bag using Dodz™.

