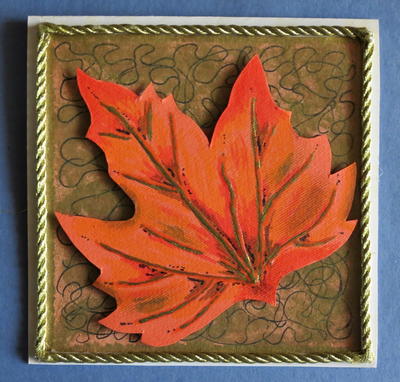
Fall Maple Leaf Greeting Card
 Why wait until Christmas to send cards to your family and friends? Tell them how much you care with this beautiful Fall Maple Leaf Greeting Card. The amount of time put into making it will say even more than whatever you write inside, because you will make it with love. You will learn how to make a greeting card with this project, and you will never look at mass produced cards again. This DIY greeting card is more beautiful than anything you will find in a store. You can even personalize them to be different for every person to whom you send it. Your friends and family will feel special and loved when they find it in their mailboxes.
Materials:
- Printout of provided pattern sheet (Click here for printout)
- 11" x 5.4" light yellow marbled cardstock
- 5" sized square cut from orange sugar paper
- 7" x 7" of thick textured orange cardstock
- 0.1" wide golden cord
- 3D self-adhesive foam squares
- Pale gold acrylic paint
- Felt tip pens in black, brown, red, orange, dark green, and yellow
- Artline 210 Fineliner black pen
- Thin paintbrush
- Scissors
- Ruler
- Pencil
- Clear-dying craft glue (such as Bostik Clear)

Fall is a beautiful time of year. Add some even more beauty with the crafts in our FREE eBook: 9 Fall Crafts and Fall Decorating Ideas!
Instructions:
1. Score the 11" x 5.4" light yellow marbled cardstock to create a card sized 5.4" x 5.4".
2. Prepare the cards background.
- Use the paintbrush and the pale gold paint to highlight the edges of the sugar paper square and allow to dry.
- Use the Artline pen to draw squiggles all over the square.
- Dip your finger in the gold paint and lightly rub the paint over the square to add a golden shimmer to the background. Allow to dry thoroughly.
3. With the fold at the top, center and glue the background to the front of the card.

4. Trace the leaf from the pattern onto the orange cardstock and cut it out.
5. Use glue to draw veins on the leaf and allow to dry thoroughly.

6. Use the felt tip pens to add color to the leaf.
- Add brown where the veins meet.
- Add brown to some other random areas, and lightly rub over the ink with your finger to obtain a blended effect.
- Add red along the veins, and also add red to random areas, again rubbing over the ink to obtain a blended effect.

- Add yellow, green, and orange in random areas, blending the colors together with your finger.
- Add shadows with the black pen, using small dots to create the illiusion of depth.
- Use the paintbrush to add pale gold paint to all the glue veins and allow to dry.

7. Use 3D foam squares to affix the leaf to the front of the card.
8. Frame the sugar paper square with the golden cord. Make sure that the cord is neatly glued at the corners, so that it won't become untangled.

Decorate your home for every season with the projects in our FREE eBook: Handmade Wreaths for All Season: 14 Wreath Tutorials!
Read NextColored Newspaper Leaves