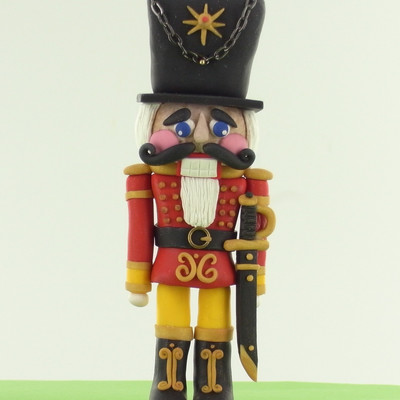
DIY Clay Christmas Nutcracker
Learn how to make Christmas crafts with clay when you complete the DIY Clay Christmas Nutcracker tutorial. A miniature model of the soldier from the Nutcracker story will be perfect for your holiday decor. You will mold each piece of the nutcracker separately and then assemble them using wire to hold the whole thing together. Your little clay nutcracker is sure to look charming among your other DIY Christmas decorations this year. This DIY Christmas nutcracker could also be a great present for family, friends, and coworkers.

Materials:
- Sculpey® III, 2 oz , Blue - 1 block of clay
- Sculpey® III, 2 oz , Black - 1 block of clay
- Sculpey® III, 2 oz , Dusty Rose - 1 block of clay
- Sculpey® III, 2 oz , Chocolate - 1 block of clay
- Sculpey® III, 2 oz , Jewelry Gold - 1 block of clay
- Sculpey® III, 2 oz , Red Hot Red - 1 block of clay
- Sculpey® III, 2 oz , Yellow - 1 block of clay
- Sculpey® III, 2 oz , White - 1 block of clay
- Sculpey® Clay Conditioning Machine
- Sculpey Clay Tool Starter Set
- Sculpey Super Slicer
- 1-3 ½” long small cable chain (any color)
- 3-1” ball head pins (any color)
- 1-5mm round jump ring-brass
- 7-1/2” length of 22 gauge wire
- Wire cutters
- Ruler
- Clear fast-dry glue
- Polyester fiber fill
Instructions:
Note: Good work surfaces include wax paper, a metal baking sheet, or disposable foil. Knead the clay until soft and smooth. Bake on oven-proof glass or metal surface at 275°F (130°C) for 30 minutes per ¼" (6 mm) thickness. For best baking results, use an oven thermometer. Begin by preheating your oven to 275°F (130 °C). For best results, condition all clay by running it through the Clay Conditioning Machine several passes on the widest setting. Fold the clay in half after each pass and insert the fold side into the rollers first.
- Create the legs with boots by making two ½” balls of black clay. Roll the balls into two logs about 1½” long. Bend the end of each log to form a boot shape. Stand the logs on the boot shape and define the boot with your fingers. Then make two 3/8” balls of yellow clay. Roll the balls into logs about ½" long for the pants. Join the yellow logs to the top of the boots.
- To trim the top of the boots, use the Clay Conditioning Machine on the #6 setting to roll out a sheet of Jewelry Gold (use about a ½” ball of clay for the sheet). Lay the sheet on your work surface and use the Super Slicer to make two strips about 1 ¼” long by 1/8” wide. Starting in the back, wrap the trim around the top of the boot until it meets the stripe in the back, make sure to cover the seam where the pant and boot meet. Cut off the excess Jewelry Gold clay. Smooth the seam with your finger.
- Cut two pieces of wire about 1 ½” long each and push the wire into the top of each leg for support. Bake the legs according to manufacturer’s instructions.

- Create the body by making a ball of Red Hot Red clay. Shape the ball into a tapered rectangle shape about 1½” tall, ½” thick and 1 ¼” wide at the shoulders. Use your fingers to pinch an indentation at the waist and make the hips about 1” wide.
- Make the belt by rolling out a small amount of black clay through the Clay Conditioning Machine on the #5 setting. Use the Super Slicer to cut a strip from the sheet about 2 ½” long and 1/8” wide. Starting at the back of the waist, wrap the strip all the way around the body until it meets itself. Cut off any excess and smooth the seam with your finger. Remember to leave enough room below the belt on the front of the body to put on a little decoration. Press the small jump ring into the front center of the belt stripe (this will be the belt buckle). Roll out a tiny strip of Jewelry Gold and place it over the jump ring for the belt closure.
- Cut two pieces of wire about 1 ½” long each and push the wires half way into the body for support.

- Once the legs are baked and thoroughly cooled you can attach them to the body. Add some Bake and Bond to the legs and slide the red body onto the ends of the wires sticking out from the legs. Make sure to press the body all the way down to create a strong bond with the yellow pant legs.
- Create the arms by making two 3/8” size balls of red. Roll the balls into logs about 7/8” long by 1/8” thick. Create the cuffs by making two ¼” balls of yellow and rolling them into logs about ¼” long by 1/8” wide. Attach the red and yellow parts of the arm by gently pressing them together.
- Create the trim for the sleeves by rolling out a small amount of Gold Jewelry using the Clay Conditioning Machine on the #6 setting. Use the Super Slicer to cut six strips about ½” long and 1/16” wide. Add the stripes to arms as shown in the final picture, making sure that all seams are lined up on the inner part of the arm (the side where the arm will meet the body). Smooth the seams with your fingers.
- Add two small balls of white for the hands, pressing them gently onto the ends of each arm.
- For the shoulder pads make two ¼” balls of the Jewelry Gold and then flatten them slightly into disks. Press them onto the top of each arm.
- Attach the arms to the body by pressing them gently onto the sides of the body. You can add a thin line of Bake and Bond on the back of the piece where the arms meet the body for added strength.

- Create the head by making a 7/8” ball of white clay. Add a couple of small pinches of chocolate to the white ball and blend to mix completely. This will make a light tan color, since most nutcrackers are wooden and you want to imitate that.
- Pinch off a tiny ball about 1/8” and set it aside to form his nose later. Roll the tan ball into an oval and slightly flatten the top. Set it aside.
- Create the collar of the jacket by making a ½” ball of Jewelry Gold into a log about 1/8” wide and about 3” long. Starting in the back, wrap the collar around the top edge of the jacket and smooth the seam where the clay overlaps.
- You can now add the head. Push it down onto the two wires all the way to the body and jacket. Push the two remaining pieces of wire into the top of the head, (about 3/8” apart), until they stop.
- Create the hair by forming a ball that is about 7/8”. Flatten it to about 1” wide and about ½” tall. Add the hair starting at one side of the head and working your way around to the other side. Using the Needle Tool, make grooves and lines to resemble strands of hair.

- To make the beard: Make a ball of white clay about 3/8”. Flatten the ball to a long oval shape, use the Super Slicer to cut a straight edge on top. For extra strength, add a few drops of Bake and Bond to the middle of the jacket above the waist. Starting under where the collar meets the jacket, press the beard onto the jacket. Using the Needle Tool, carve lines to resemble whiskers.
- To make the mouth: Use the Clay Conditioning Machine on the #5 setting to make a small sheet of Red Hot Red. Use the Super Slicer to cut a red rectangle ½” wide by 3/8” tall. Roll out a small amount of white clay into a sheet and cut a rectangle about 3/8” wide by 3/16” tall. Add a couple of drops of Bake and Bond to the back of the red rectangle and add it to the lower face. The bottom of the mouth should meet the top of the beard. Press lightly to adhere. Add the white rectangle to the middle of the red rectangle. Use the Needle Tool to carve two rows of teeth.
- To make the cheeks: Make two 1/8” balls of Dusty Rose. Flatten them to form disks about ¼” round. Add to the face on each side next to corners of the mouth.
- To make the mustache: Make two 3/8” balls of black clay. Roll them out into two thin snakes about 1 ¼” long, pointed at one end and slightly rounded at the other. Curve the snakes to resemble a mustache. Add to the face just above the teeth. Curl the pointed ends on the bottom of the cheeks.

- To make the eyes: Make two balls of white clay about 1/8” wide. Flatten into disks and press them above the cheeks. Make one 1/8” ball of blue. Use the Super Slicer to cut it in half. Flatten the two pieces into disks. Add the blue to the center of white disk. Then take a very tiny speck of white and form a ball. Add to each eye for the highlight.
- To make the nose: Use the reserved ball of tan clay and form a long teardrop. Press onto the center of the face in between the eyes with the rounded edge of the nose slightly overlapping the middle of the mustache.
- To make the eyebrows: Make two 1/8” balls of black clay. Shape them into two long teardrop shapes and add above the eye at an angle with the pointed ends facing out toward the sides.

- Bake the facial features according to manufacturer’s instructions.
- To create the hat, form a 1” ball of black clay and make a rectangle which is 1” tall. The top should be about 1” wide and the bottom (where it meets the brim) should be ¾” wide. The overall hat should be about 3/8” thick. For the brim, use the Clay Conditioning Machine to roll out a sheet of black clay on the #3 setting. Use the Super Slicer to cut a rectangle that is 1 1/8” by 5/16”. Press the top part of the hat onto the brim. The hat should be even with the brim edge in the back. There should be a brim edge of about 1/8” in front and a little more on the sides. To add the chain, push the final piece of wire into the top of the hat, in the middle. Push it all the way in until it stops. Trim the top of the wire to about ¼”.
- Push the two ball pins into the top of the hat, one of each side of the center wire. Don’t push these in all the way. They should be close to the edge of the top the hat. Drape the small chain as desired. You want the chain to be dangling on the front of the hat. If it is too long, trim enough links off so that it dangles just far enough to add the decoration in the middle of the hat. It should not rest on the brim. Once you have the chain where you like, trim the last ball pin to 1/4” and place it through the chain on the front of the hat. Then, push the other two top ball end pins all of the way in.

- Make a ball of Jewelry Gold clay, about ¼” across. Form it into a rounded oval shape. Add some Bake and Bond to the middle of the top of the hat to cover the center wire and the two chain links around it. Slide the Jewelry Gold oval onto the wire until it meets the black clay for the hat. If the oval becomes distorted from pushing it onto the wire, smooth it back into shape.

- You can now add your hat to the rest of the baked and completely cooled figure. Add Bake and Bond to the top of the head and slide the hat down onto the two wires. Gently but firmly press onto the head. Bake the entire figure.
- For the gold buttons on the front of the jacket, roll out a very thin snake of Jewelry Gold. Use your Super Slicer to cut eight tiny balls. Use a small amount of Bake and Bond to attach four buttons onto each side of the jacket front. For the gold decorations on the bottom of the jacket, using a 1/4” ball of Jewelry Gold, roll out two snakes about ¾” long. Curl the ends of the clays as shown. Make a very tiny ball to place between them. Attach this to the jacket with a small amount of Bake and Bond.
- For the star on the front of the hat, roll out another very thin snake of Jewelry Gold. Use the Super Slicer to cut four pieces about 3/8” long. Use a small amount of Bake and Bond on the center of the front of the hat and criss-cross the strips to make a star shape. Make a tiny ball of Jewelry Gold and use Bake and Bond to attach it to the center of the star. Press gently but firmly to adhere.
- For the gold decorations on the boots, make a ball about 1/2” of Jewelry Gold. Roll it into a long, thin snake. Use the Super Slicer to cut four pieces about ¾” long. Curl the ends of all four. Make sure the design fits on the front of the boots. Depending on the size of your boot, you may need to measure to be sure. Create two tiny balls of clay to add to the top of the swirls. Attach these to the boots with a small amount of Bake and Bond.
- Create the sword by rolling out a sheet of black clay using the Clay Conditioning Machine on the thickest setting. Use the Super Slicer to cut out the sword shape. Make sure it is 1 ¼” long by 3/8” wide. Cut off the tip to make a diagonal point. Lay the sword on your work surface. Form a 3/8” ball of Jewelry Gold into a thinner log about ½” long. Curve it to form a half-circle and attach to the side of the handle. Form a Jewelry Gold ball about 1/8” wide and flatten it to the top of the handle. Embellish the sword with tiny dots and stripes of Jewelry Gold. Place a tiny strip of gold clay on the very tip of the sword, remembering to form a point. Attach the sword to the arm with a small amount of Bake and Bond. Bake the figure with the decorations and the sword according to the manufacturer’s directions.

- To create the stand, form a 1” ball of Red Hot Red and flatten it to make a disk about ¼” thick in the middle and about 1 5/8” wide in diameter. Take the cooled nutcracker and set him in the middle of the disk. You want to make an impression of the bottoms of his boots. Firmly, but gently push down while holding on to his legs to make the impression. Make sure the figure is able to stand straight up when the impression is made. Bake the stand according the manufacturer's directions. When the stand is baked and cooled, place a few drops of clear, fast drying glue into the boot impressions. Then, place the Nutcracker into the stand and hold him straight until the glue sets.

Note: When baking your piece in the above steps, use a mound of polyester fiber fill to ensure the piece is supported and doesn’t get flat spots.
Read NextSparkly Santa Jar