Handmade Kwanzaa Minibook
Personalize a minibook with some fabric and stamps to make your own Handmade Kwanzaa Minibook. This tutorial will show you how to craft a special cover for your minibook so you can use it to record the details of your family’s Kwanzaa celebrations. This do-it-yourself craft also shows you how to label pages with the seven basic principles of Kwanzaa. Fill this book with memories, and turn this craft into a sentimental gift for any loved one.

Materials:
- Minibook
- fabric scraps
- fusible web
- thread
- embroidery floss (optional)
- red, yellow, green, and black cardstock
Instructions:
-
Measure the height and width of the cover of your minibook and add 3/4 inch to each side. Cut 2 pieces of fabric to this size. With the fabric pieces right sides together, sew a 1/2 inch seam along the top, right side, and bottom of the cover, backstitching at the starting and stopping points. Trim the corners to reduce bulk. Fold the seams open and back so they lie against the cover and iron them flat. Fold back the edges of the open side of the cover 3/4 inch and iron.

-
Turn the cover right side out and slip in a piece of quilt batting cut to the minibook cover size. Slide the fabric cover over the minibook cover to check the size. If it is too loose, remove the batting, turn the fabric cover inside out, and stitch slightly inside the previous seam allowance to make the opening narrower. Also adjust the pressed hems on the open side of the fabric cover if needed. Leave the fabric cover removed from the book.

-
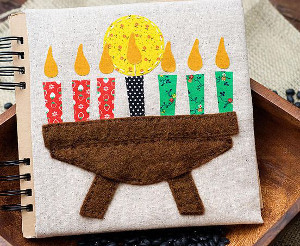
Cut pieces of brown felt in the shapes shown to create the kinara. The shape shown in the center can be easily created by cutting a rectangle, marking the center point of the bottom edge, and angling a cut from the top corners down to the marked midpoint. Brown fabric can be used in lieu of felt.

-
Hand stitch the pieces of the kinara to the lower portion of the fabric cover.

-
Following the package instructions, iron fusible web onto the back side of red, green, and black, and 2 different yellow fabrics. Using the Cupcakes and More Shape Template, trace candles onto the paper backing of the fusible web. Trace the flames onto one of the yellow fabrics. Using the Circles Shape Template, trace a circle onto the other yellow fabric. Cut out all of the pieces.

-
Iron all of the appliques to the cover as shown. Handstitch around the candle glow circle and add wicks to each of the candles if desired. Slip the completed fabric cover over the minibook cover.

-
Cut 3 red, 3 green, and 1 black 1 1/2 inch strips from cardstock. The strips should be cut to the same height as the pages of the minibook. Use the Diamond Edge Border Punch on one edge of each strip. Back the strips with yellow cardstock and, after dividing the book pages into 7 equal sections, adhere the colored strips to the right-hand edge of the minibook pages with the black strip being first, then the red strips, and ending with the green strips.

-
Using the Alpha Basic Stamp set and black ink, stamp fabric pieces with each of the 7 principles of Kwanzaa: Umoja, Kujichagulia, Ujima, Ujamaa, Nia, Kuumba, and Imani.

-
Adhere the fabric strips to the top of minibook pages.