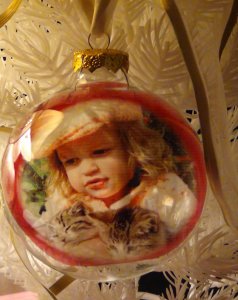
Easy Homemade Photo Ornaments
Put your favorite pictures on display with these Easy Homemade Photo Ornaments! This tutorial shows you how to perfectly position images to create glass photo ornaments that you'll treasure for years to come! You won't believe how simple it is to create a custom photo ornament that looks professionally made!
Materials:
- Glass ornament
- Ink jet transparency
- Ink jet printer
- Computer
- Scissors
- Tweezers
Instructions:
- Edit photo on computer to look as desired. Size to fit inside ornament.
- Print photo onto transparency.
- Cut out image.
- Roll printed image into cylinder shape and place inside ornament.
- Replace ornament cap.
Video:
Your Recently Viewed Projects

Thanks for your comment. Don't forget to share!
tkanderson1994
Dec 22, 2012
what kind of paper or transparency paper is this?! where can it be bought?
cecountry 8803176
Dec 21, 2011
I had seen this on the Carol Duvall show years ago . I just made 8 of them for my bible class kids. I put snowtext on top with name and year made so they can see how long they have had them. I had made them for my kids and they still have theirs years later.
Report Inappropriate Comment
Are you sure you would like to report this comment? It will be flagged for our moderators to take action.
Thank you for taking the time to improve the content on our site.