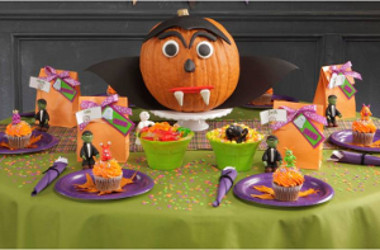
Spooky Halloween Tablescape
If you're in need of some festive Halloween decorating ideas, then the Spooky Halloween Tablescape is just what you're looking for. This DIY Halloween decor is perfect for any parties you throw this holiday. Learn how to make Halloween decorations that aren't tacky and most certainly aren't unoriginal. These decorations are so unique, all your guests are sure to fall in love. Set up your party decor on a table to add some frightfully spooky flair to your dessert bar or buffet table. You can't lose wherever you decide to set up your amazing Halloween tablescape.

Materials:
Clays:
- Sculpey® III, 2 oz , Black - 1 block
- Sculpey® III, 2 oz , Granny Smith - 1 block
- Sculpey® III, 2 oz, Hazelnut - 1 block
- Sculpey® III, 2 oz , Lemonade - 1 block
- Sculpey® III, 2 oz , Pewter - 1 block
- Sculpey® III, 2 oz , Red Hot Red - 1 block
- Sculpey® III, 2 oz , Sky Blue - 1 block
- Sculpey® III, 2 oz , Sweet Potato - 1 block
- Sculpey® III, 2 oz , Violet - 1 block
- Sculpey® III, 2 oz , White - 1 block
Tools:
- Sculpey® Clay Conditioning Machine
- Sculpey Acrylic Roller
- Sculpey Clay Tool Starter Set
Additional Supplies:
- Ruler
- 24-gauge wire
- Wire cutters
- Wood toothpicks
- Ribbon for treat bag tags
- Glass or metal bowl
Instructions:
- Preheat oven to 275 °F. Test temperature with oven thermometer for perfectly cured clay. Condition all clay by kneading until it’s soft and smooth or running it through the Clay Conditioning Machine for several passes on the widest setting. Fold the clay in half after each pass and insert the fold side into the rollers first.
- Make Black 1" wide x 1-1/4" high cone and hollow out the center with pointed tool for body. Make Black 1/2" diameter x 2" long log, thin center slightly and bend in half for legs. Press legs into hollow part of cone. Make two Hazelnut 3/4" ovals and press on leg bottoms for shoes. Make thin White 1-1/4" x 3/8" strip and press on body for shirt. Make two thin Black strips, 1/4" x 1-1/4", and press on either side of shirt for lapels. Make thin Black 1/4" x 1-1/2" x 1/4" strip and curve into half circle. Press around neck for collar. Make two Black 1/2" x 1-1/4" cones and hollow out wide end for sleeves. Make two Moss 5/8" flat teardrops and press in thumb line for hands. Press into hollow end of sleeves. Make Moss 1" x 3/4" oval for head. Make Black 1" x 3/4" flat oval, use tools to draw lines, and press on head for hair. Make two Moss 1/4" flat ovals, press in center with pointed tool, and press on head for ears. Make 1/8" Moss ball and press on face for nose. Make two Lemonade 1/8" balls and press on face for eyeballs. Make two tiny Black balls and press on eyeballs. Use needle tool to draw mouth and scar. Make two Black 1/4" logs and press on face for eyebrows. Make two Pewter 3/8" cones and press on neck for bolts. Press head on body. With wire cutters, cut 3" wire and bend one end into spiral. Insert straight end into head.

- Make Sweet Potato 3/4" x 1" teardrop for body. Make two Sweet Potato 1/4" x 3/4" cones, press on work surface to flatten bottom, and press on body for legs. Press in line for toes. Make two Sweet Potato 1/4" x 1/2" flat teardrops, press in lines to make hands, and press on body for arms. Make Violet 3/8" flat circle and press on for tummy. Make two Violet 1/4" x 1/2" cones and press on head for horns. Make White 1/8" ball and press on for eyeball. Make tiny Black ball and press on eyeball. Draw mouth with needle tool. Make four White tiny teardrops and press on mouth for fangs. Make tiny Violet balls and press on randomly for warts. Press toothpick in bottom.

- Make Granny Smith 1/2" x 3/4" oval for body. Make Granny Smith 1/2" ball and press on body for head. Make two Granny Smith 1/4" x 1/2" cones, press on work surface to flatten bottom, and press on body for legs. Press in lines for toes. Make two Granny Smith 1/4" x 1/2" flat teardrops, press in lines to make fingers, and press on body for arms. Make Granny Smith1/4" x 1" teardrop and press on for tail. Make two Sweet Potato 1/4" x 1/2" cones and press on head for horns. With needle tool, press on line for mouth. Make Sweet Potato 1/8" teardrop and press on mouth for tongue. Make tiny White teardrop and press on mouth for fang. Make three White 1/8" balls and press on head for eyeballs. Make three tiny Black balls and press on eyeballs. Make tiny Sweet Potato balls and press on randomly for warts. Press toothpick in bottom.

- Make Violet 1" x 1/4" oval and press on work surface to flatten one end. Pinch flat end into bell-shaped body. Make two Violet 1/4" x 1/2" flat teardrops, press in lines to make fingers, and press on body for arms. Make three Lemonade 1/4" x 1/2" cones and press on head for horns. With needle tool, press in line for mouth. Make two tiny White teardrops and press on mouth for fangs. Make four White 1/8" balls and press on head for eyeballs. Make four tiny Black balls and pres on eyeballs. Make tiny Lemonade balls and press on randomly for warts. Press toothpick in bottom.

- Make Red Hot Red 3/4" x 1" teardrop for body. Make two Red Hot Red 3/8" x 1/2" flat teardrops, press in lines for toes, and press on body for feet. Make two Red Hot Red 1/4" x 1/2" logs for antennae. Make two White 1/4" ball for eyeball. Press 1/8" Black ball on each eyeball. Press eyes on antennae and press antennae on head. With needle tool, press on mouth. Make Sky Blue 1/4" teardrop and press on for nose. Make Sky Blue 1/8" teardrop and press on for tongue. Make tiny White teardrop and press on mouth for fang. Make tiny Sky Blue balls and press on randomly for warts. Press toothpick in bottom.

- On #1 Clay Conditioning Machine setting, Make Violet clay sheet. Cut out 3-1/2" x 1-1/2" rectangle for tag. Use Alphabet Stamper to stamp name and trim around name. On #3 Clay Conditioning Machine setting, make Granny Smith sheet. Cut out 1-1/4" x 3" rectangle. Press onto Violet rectangle. Press on name strip. Mix White and Sky Blue to make light gray color and shape a 1-1/4" x 1-1/4" flat ghost. Press ghost on tag. Use needle tool to press in mouth. Make two tiny Black balls and press on ghost for eyes. Make two tiny White teardrops and press on ghost for fangs. Use needle tool to make hanging hole for tag.

- Make White 1" x 1-1/2" teardrop for body. Make two White 3/8" diameter x 2-1/4" long logs for legs. Push one end of each log to make feet. Bend one leg at the knee. Press legs on body. Make two White 1/4" x 2" logs and press one end flat to make arms. Press on body. Make White 3/4" ball and press on body for head. Make 1/4" teardrop and press on face for nose. With Clay Conditioning Machine on #4 setting, make White sheet. Using ruler and cutting tool to cut thin strips. Wrap strips around mummy. Make two tiny Black balls and press on for eyes. Shape arms to hook onto bowl rim. Remove before baking.

- Make Black 1-1/4" ball for body. Make Black 3/4" ball and press on body for head. Make eight Black 1/8" diameter x 2" long logs for legs. Bend legs and press on body. Make two White 1/8" balls and press on for eyeballs. Make two tiny Black balls and press on eyeballs. Make two 1/8" White teardrops and press on for fangs. Press spider on bowl rim to shape. Remove before baking.

- Note: Make pieces at least 1/4" thick. Make Black 9" x 2" slab and cut hair shape as shown. Make two Black 3" x 1/2" logs and shape into eyebrows. Make two White 2" flat circles. Make two Black flat circles and press on White circles for eyes. Make Black 1-1/4" diameter x 1-1/2" high cone for nose. Make Red Hot Red 1/4" x 4" log and 1/4"x 4-1/2" log for lips. Press lips together. Make two White 1" x 2" flat triangles for fangs and press on lips. Press toothpicks into backs of face pieces to attach to pumpkin after baking.

- Bake as directed above. Allow to cool completely before handling.
- Cut computer paper to fit under cupcake picks so baked clay does not touch frosting.
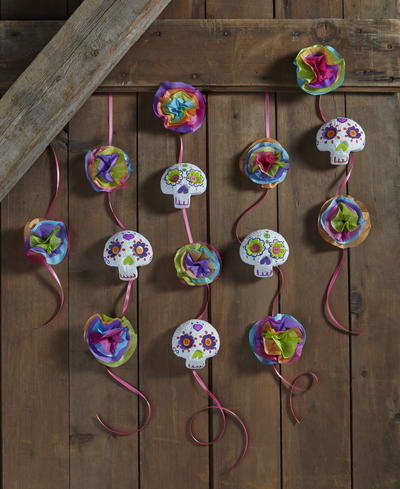
Read NextDay of the Dead Garland