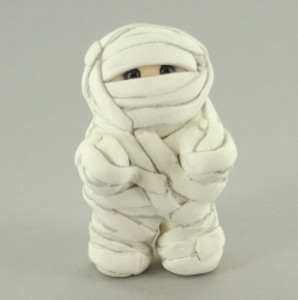
Adorably Easy Clay Mummy
Homemade Halloween decorations are a great way to unleash your creativity and make unique crafts to show off around your home. The Adorably Easy Clay Mummy is just the decoration you need to make. Set this little guy up on a ledge, the fireplace mantle, or windowsill for some extra Halloween fun. Learn how to make a mummy with this super easy tutorial. You'll find that this project is so quick, you can make tons of little mummies to scatter around your home.

Materials:
Clays:
- Premo! Sculpey®, 2 oz , White - 1 block
- Sculpey® III, 2 oz , Beige - 1 block
Tools:
- Sculpey® Clay Conditioning Machine
- Sculpey® Clay Extruder
Additional Supplies:
- Black teardrop glass beads
- Gray acrylic paint
- Paintbrush
Instructions:
- Start with clean hands and work surface area. Good work surfaces include wax paper, metal baking sheet, or disposable foil. Knead clay until soft and smooth. For best results, clean your hands in between colors. Shape clay, pressing pieces together firmly. Bake on oven-proof glass or metal surface at 275 °F for 30 minutes per 1/4 in thickness. For best baking results, use an oven thermometer. DO NOT USE MICROWAVE OVEN. DO NOT EXCEED THE ABOVE TEMPERATURE OR RECOMMENDED BAKING TIME. Wash hands after use. Begin by preheating oven to 275 °F. Test temperature with oven thermometer for perfectly cured clay. For best results, condition all clay by running it through the clay dedicated pasta machine several passes on the widest setting. Fold the clay in half after each pass and insert the fold side into the rollers first.
- Condition ½ the Premo! White clay. Form a very basic body with a rounded head and arms sticking out in front. This does not have to be perfect because you will be covering it will extruded clay. You just need to get the basic shape.

- Roll out a tiny bit of Beige clay into a nice thin piece and cut into a small rectangle. Press this piece across the face area. Push the two Black glass beads into the clay for the eyes. Once this is done, extrude lots of long strips of White clay using the smallest flat rectangular disc that comes with your extruder. Start wrapping your mummy with the extruded clay pieces. Start with the face area and go around and close to the eyes. Wrap around, up and over. Press gently in areas where the clay might not be forming close enough to the body. Keep wrapping until your are satisfied with your mummy. You don’t have to cover every little corner because the body underneath is White as well.

- Your little mummy is ready to be baked. Make sure he can stand nicely on his own before baking. Bake according to the directions above. Allow to cool completely. Once cooled, make a nice wash of Gray acrylic paint. Brush this washy paint into the creases and criss-cross areas of the wrappings. This will give some depth to the piece. Allow to dry completely. There you have it! So easy to make and so cute for Halloween!
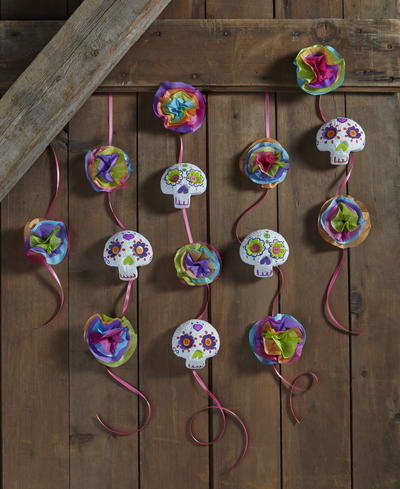
Read NextDay of the Dead Garland